Tag Archives | Toes

Handstand Muscles

Today’s post will answer another question from the many I regularly receive.

“Hey I am Stefan I am now starting out with doing the handstand, but my question is what muscles are involved in doing the handstand and what exercises can I do to improve it?”

Let’s start with the first question, what muscles are involved in the handstand? And the answer is all of them.

When you’re starting out you need to be able to keep your body tight if you want to have any chance of staying upside down. This means every muscle must be engaged from the tips of your fingertips down to your toes.

This doesn’t mean you flex everything as hard as possible but you must stay tight. As you advance you’ll learn how to use only as much tension as is needed and no more. This allows you to go for longer periods. But to start out with squeeze all those muscles, arms, back, abs, legs and even the toes.

Now onto the second question. There is a rule of thumb in training. In order to get good at something you must do that thing. So if you want to get good at handstands you must do a lot of handstands. There is no way around this.

This is true but in some cases you’re better off working on easier skills. Do skills that are easier then the handstand itself that build up the same abilities that the handstand needs. For the handstand these include a wall handstand, frogstand, forearm stand, and headstand. All the details and proper progression for this is laid out in the Secrets of the Handstand Quickstart DVD.

Work on easier skills that lead up to the harder ones. For anything else in hand balancing check out the Hand Balancing Mastery Course.

As an analogy, if you wanted to learn the piano you wouldn’t start out with the Rach 3 but instead focus on scales and simple songs first. This concept holds true for all skills you desire to build.

The True Art and Science of Hand Balancing
The True Art and Science of Hand Balancing on Amazon

Good Luck and Good Hand Balancing,
Logan Christopher

Comments { 7 }

Biggest Hand Balancing Tip

I was hand balancing for a long time before I realized this tip. And when I did I immediately improved my abilities.

We’re talking about almost doubling the amount of time I could hold a handstand. Being able to do multiple complete pirouette turns versus falling after just turning 180 degrees.


Biggest Tip for Handstands

By paying attention to the furthest point from where you are balancing (i.e. your toes) you’ll be able to correct any shift in your balance before its too late.

To really drive this home do a little experiment with me. Go ahead and try a handstand while putting all your attention on your hands.

Now try it while paying attention to your feet.

Tumbling Illustrated
Tumbling Illustrated on Amazon

After you’ve done that report your results by commenting below.

Good Luck and Good Hand Balancing,
Logan Christopher

Comments { 6 }

Scissors Handstand

After most people, myself included, have some success with the handstand they want to move on to a variety of stunts, most of which are much harder.

My advice, nowadays, is to stick with the handstand itself for a bit longer.

Yes, you can always just work on adding more time in a hold while improving your balance. But to spice it up a little bit try changing up your position.

Learn How to Back Flip in 31 Days
Learn How to Back Flip in 31 Days on Amazon

There are a huge amount of different ways you can do this with different areas of your body. For today let’s focus on the legs.

Again, any possible way you can move your legs can be done in the handstand but let’s narrow it down to just one. The Scissors Handstand.

Scissors Handstand by Bob Jones
From The True Art and Science of Hand Balancing:

“Do a hand stand in nice form, then separate the legs, one backward and the other forward. Start the legs backward and forward in scissor fashion. Go slowly at first, and increase the speed, and come to a sudden stop with the feet and legs in nice form. While in the motion, the legs should be kept straight, with the toes pointed. This trick is very effective and is not hard to learn. Variations of the above are, scissors while walking on the hands, also scissors with the head forward through the arms.”

Check out the hand balancing book for many other moves just like this one.

Good Luck and Good Hand Balancing,
Logan Christopher

Comments { 0 }

Correcting Bad Handstand Habits

First off thanks to everyone who took the time to fill out the short survey. I appreciate you spending your time to help me out even it its just a couple minutes. I’ll be sharing what everyone said a little later on but today I thought I’d tackle a couple questions.

But before that a few other updates. That last blog post on the planche brought a couple great comments. I’ll delve further into that subject soon (with a few more pictures). In fact, there’s been a few comments on several different blog posts which I’m pleased with. Keep the conversation going.

And recently, I was notified that the company that makes the Elite Rings and Ring Strength DVD has switched over to fre e shipping within the USA. And I’m passing that offer on to you.

So if you are in the US you can get these products even cheaper now!

Now onto the questions. It’s a long one but worth reading.

“I’ve been practicing (more or less playing with) handstands and handbalancing for about a year.  I taught myself 100% and so I’ve adopted ALOT of bad habits. I can walk yards forward or backwards on my hands, I’ve held a handstand for 42 seconds once, and I’ve even been expirimenting with walking up and down stairs with some mild success.

“Unfortunately, despite the impressive feets that I can achieve I get criticized frequently on my form.  My back has a huge arch and I let my legs dangle over my head.  It works for me, but just doesn’t have that impressive look to it.  I’m sure it’s not hard to teach someone to keep their legs together and toes pointed, but after a year of success it’s a little bit harder to break the habit. Plus I get frustrated easier because I think ”I can just do it better my way anyway.”  So as you may have already guessed, because I usually let my legs dangle, when I try to pick them up I underbalance.  It’s like trying to learn it all over again and It’s quite frustrating. If you have any tips on gradually recovering from this habit as opposed to just relearning it I would appreciate your advice. And is it suppose to be harder or easier with you legs together?

“A second question I have is a specific skill question.  I can walk in a circle on my hands, but I can’t stay in one place and pivot around.  It would be a cool tutorial for you to make if you can teach how to pivot on your hands. Or if you could just point me in the right direction that would be cool too.”

Thank you for your time,
Josh Reed

Thank you for taking the time to write a detailed question. Much easier to answer this when there’s lots to draw from.

About the form and how to correct it. First let me start by saying why some people go towards the feet hanging form. Because of the bend at the knees the lower legs are hanging down and this effectively lowers your center of gravity. Also like you mentioned it throws your weight a bit more forward toward an overbalance.

If its easier why is it not generally recommended? The key word is the legs were ‘dangling’ over the head. In this position it is harder to keep the legs under control, and without control hand balancing becomes much harder. You want the legs together and straight so that they act like one object, which is easy to control.

It may be a bit harder in the beginning but in the long run it’ll make more advanced stunts (and doing simpler ones for longer) that much easier.

This is a case of taking two steps back so you can move three steps forward. Yes, you’ll have to go back to re-learn the move in a sense. Going back to the wall will help.

But the best thing I think would be to learn how to move from one position to the other. Learn to stay in a stationary handstand. Raise and bring the feet together from your hanging, knees bent position, then go back and forth. Raising and lowering them under control.

Your handstand position isn’t wrong (even if others say its ugly). You should be able to assume any position you want. Learn to control your legs and make them do what they want.

Which brings me to the next question regarding doing pirouettes. Turning around in one spot is much harder than just walking forwards.

I’ll likely do a longer tutorial later on but for now just a couple tips. Start off with small steps and gradually reduce the number you use over time. Eventually it should only take two steps to turn around, but start with up to six if you need to.

Also pay attention to the feet. Its common just to focus on the hands as you do the move but giving mind to the furthest point from your balance will help you even more to stay up. And this goes for all walking and even standing still.

How to do the One Hand Handstand by Professor Orlick
ow to do the One Hand Handstand on Amazon

“I have subscribed to your Updater and it seems like Every time I learn of something new from a friend or somewhere on the internet I come to my e-mail to find you have already e-mailed me with a new set of tips or instructions JUST ON THE VERY THING! This is far from a question but I wanted to let you know you personally inspired me to continue my journey to become stronger and more powerful then I ever thought possible.”

Balancing diligently
~Matt

Thanks a lot Matt. I am happy to inspire and teach. And that’s going to wrap it up for today.

Good Luck and Good Hand Balancing,
Logan Christopher

Comments { 0 }

The True Planche

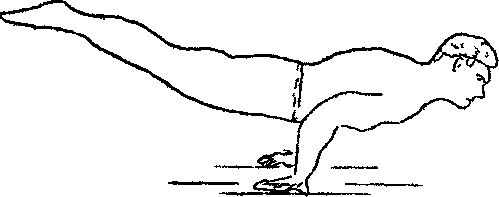
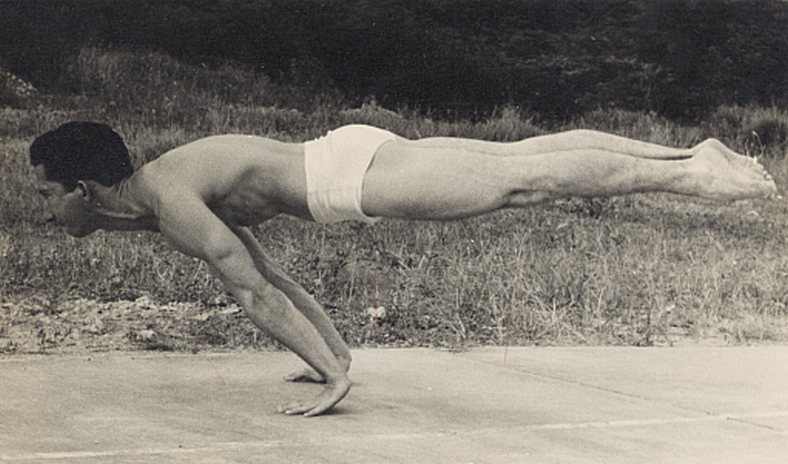
An older hand balancer recently sent me a CD full of pictures of himself and others hand balancing. There are some amazing pictures and I thought I’d start off with one of the best. And there will be many more coming posted up here. Without further adieu meet Rafael Guerrero.

A Planche in the best form.

What most people don’t realize is how to do the planche correctly. While any semblance of a planche is a great display of strength and skill, when you can pull it off in this form its that much better. Of course to do it like this being a much smaller size is a plus!

Here’s a small section from The True Art and Science of Hand Balancing talking about the correct form of the skill.

“As exemplified by Paulinetti, the planche on two hand’s finds the body straight, flat and horizontal from throat to toes, and especially from throat to pelvis. Since the chest is thicker than the waist, this means that the shoulders are decidedly humped, corresponding very much to the hips. The position is much as if the performer were lying on a bench with chin and toes extended over either end–there is no arch in the back, and the hips are NOT flexed at all. This is where much of the trouble comes in, just as in doing the straight handstand with the head between the arms. Usually the performer gets the chest fairly well positioned, but instead of leaving the hips straight and then flexing the waist area of the spine slightly, he leaves his arch in the back and jack-knifes the legs forward (pretty much as in Figure 6) in order to get the feet down into line with the trunk. Again, in trying the planche–especially if endeavoring to get the flat chest effect–he neglects to thrust the chin forward and as a result has his face looking right at the floor instead of raised about 45 degrees and looking straight ahead.

“All in all, the correct position is decidedly not a normal one to attain, especially to a balancer accustomed to arching his back, and nine out of ten aspirants never even approach it. They usually wind up in nothing other than a “horizontal handstand” position–back arched, head up, and latissimus muscles hooked against the triceps. Understand, this is much of an accomplishment in its own right…but it is not the true planche.”

Trampoline Handbook
Trampoline Handbook on Amazon

If you want to find out much more on the planche the read the full chapter in the book for the full details. But now you know some of the specifics for what it takes to do a true planche.

Good Luck and Good Hand Balancing,
Logan Christopher
P.S. There’s still time to take the short survey so I can find out exactly what you want. Click here.

Comments { 10 }

Basic Handstand Help

I’ve received quite a few questions lately, so today I’m going to dive into the proverbially mail bag. Remember you can submit your hand balancing questions here.

Here’s a few different questions from Cheryl.

“Which part of my body to focus for balancing when i hold a handstand. Do I use my backbend to balance? Do I inner or outer rotate my thighs to balance? Do I grip my fingers to balance? thank you very much.”

Trampoline Handbook
Trampoline Handbook on Amazon

“How to lift to handstand as each time i kick up I will either past centre or cant reach the centre. Which part of my body should I engage and how? Thank you very much.”

These are good questions Cheryl and they actually overlap a bit.

You want your entire body to stay tight, from you toes through your back all the way to your fingers. At no point (except when doing certain tricks) should you be balancing by using your legs or back.

The balance should be maintained with pressure of the fingertips. You can maintain balance with your arms and shoulders but for a beginner you should get these just as locked out as the rest of the body and use only the fingers.

The kick-up is a skill in and of itself that must be specifically practiced like the handstand. Improve your kick-up and getting into the handstand becomes easy.

It’s really a matter of kicking up with the same amount of force each time so that you hit the sweet spot, not overbalancing, not underbalancing.

And like stated earlier when you are in position your whole body engages.

These are the basics of the handstand. Get them down and you’ll be holding handstands effortlessly.

Good Luck and Good Hand Balancing,
Logan Christopher
P.S. If you want more help on how to do maintain the proper position, how to train the kick-up and extra exercises check out The Secrets of the Handstand Quickstart Guide.

Comments { 0 }

Don't Relax in Your Handstand

Relaxation

It something we all need. Especially living in this day and age. Too many people live their lives way to strung out, ready to explode at the next little thing.

There is a time to sit back and do nothing. Get a massage, meditate, shut down all the electronics and go for a walk.

These sort of things should be a common part of your life. You want to maintain a calm demeanor because life is just better that way.

But then there are times to turn up the tension. To act and act quickly.

When it comes to hand balancing, the art definitely falls into the later category. Yes you can teach your body to relax but standing on the hands is not the time.

Especially when you are starting out, the tendency is to have the legs to flop around, the back to relax and body to come out of position.

In order to stay up in the air you want to remain like a stiff board from the tips of you fingers to the tips of your toes.

This doesn’t mean you tighten up as hard as possible as if you were under a thousand pound load. But you stay tight so that gravity doesn’t have its way with you.

And don’t forget to breathe.

Trampoline Handbook
Trampoline Handbook on Amazon

Without maintaining this tension you may be able to stand on your hands or walk around but not for long, nor will you be able to move up to anything harder.

If you’ve been relaxing this is your reminder to get back in gear.

The Secrets of the Handstand Quickstart Guide covers this difference between relaxing and staying tight in more depth.

When it was re-released last week I said that new buyers would get last month’s issue of Acrobat Accelerator for free along with this month’s.

Well, I forgot to mention when that ended. So here’s the date. You have until Tuesday the 15th. After that you won’t be able to get the June issue again.

If your on the fence, now’s the time.

Good Luck and Good Hand Balancing,
Logan Christopher

 PR: wait…  I: wait…  L: wait…  LD: wait…  I: wait… wait…  C: wait…  SD: wait…
Comments { 0 }

What a broom can teach you about hand balancing

Everyone has done this at one time or another. A broom is a common item but any long straight object will do just fine.

Put one end on your open palm with the other end straight up in the air and keep it there by balancing.

This is not very difficult and let me tell you why. The broom is straight and solid. Your efforts at balancing it from the bottom translate straight up to the top so it is quite easy to keep it in the air.

Of course, this is related to hand balancing. However, there are some big differences.

Ultimate Guide to Handstand Pushups
Ultimate Guide to Handstand Pushups on Amazon

Your body is not just one straight long object. You have mobile joints at your elbows, shoulders, hips, knees and ankles. And then there’s your spine which has many moving pieces.

This is not an anatomy lesson. My point is that your efforts of balancing on your hands may not directly translate to keeping your feet in the air.

Your target must be keeping your body from wrists to toes unmoving so that you can balance.

Keeping your body tight is the key to holding a quality handstand. Any leak means getting out of proper position and a much tougher time getting back in.

So stay tight, but don’t forget to breathe.

In the beginning all this is not as easy as it appears, especially when you are in the unfamiliar upside down position. But keep practicing.

When you can keep your body rigid then handstands are a piece of cake.

Sincerely,
Logan Christopher

P.S. For in depth instuctions on how to get into position and hold it check out Professor Paulinetti and Bob Jones’ Book

Comments { 0 }

Handstand Lead-up Stunts (The Two Arm Elbow Planche)

In Handbalancing Made Easy, Professor E.M. Orlick explains that there are a number of stunts which will  teach you many of the aspects that are needed for a good handstand. Two of these stunts are covered in the downloadable guide. These are the headstand and frogstand. Today I want to talk about one more of the 21 covered in the course.

In his own words these are the benefits on mastering all of these stunts.

The following lead-up stunts constitute stepping stones to perfection. They serve a multiple purpose and are of inestimable value. Taken alone each is a stunt in itself and worth learning even if you had no interest in handbalancing. All of them have something in common to the handstand and thus, pave the way for good handbalancing.

Each accustoms you to the upside-down position of the handstand, each helps to develop the strength, balance and muscular coordination necessary to handbalancing. Many form the very basis of the advanced stunts which will be dealt with later.

Anyone who sincerely desires to become an expert at the art of handbalancing should master each and everyone of these lead-up stunts. Even if you can hold a fairly good handstand now you should practice these stunts, for no matter how good you may be there is always room for improvement.

The Two Arm Elbow Planche.

Two Arm Elbow Planche

In addition to being an excellent lead-up trick the two arm elbow planche plays an important part in advanced handbalancing. Many difficult stunts can be built around it.

To perform the trick kneel on the floor, bring both elbows together and place them in your stomach and turn the palms of the hands facing upwards. Now lean forwards slowly and place the hands flat on the floor with your fingers pointing backwards. Arch your back slowly until your toes leave the floor and you will be doing the two arm elbow planche.

You will find the balance a little difficult at first but just keep on practicing. The stunt can also be performed on the edge of a table or on the end of any ordinary bed.

I have also heard this move called many other things, from an elbow lever to a half-arm planche. The obvious next step, and much more advanced, is to switch to doing this move on a single arm.

Walking and Jumping On Your HandsWalking and Jumping On Your Hands on Amazon

Why is this stunt helpful? It trains the balancing aspect on your hands from a low center of gravity. You also have to keep a decent arch and your body tight or else you will touch the ground with more than your hands.

Looking back I realize just how helpful these lead-up stunts are. I was going after a handstand before I could easily hold a headstand. Logically, you should go after the easier stunts first before tackling the more difficult.

The great thing about this course is just about every stunt and move shown leads in to the next one. If you want to get the One Hand Handstand then you have eight different lead-up stunts before you even attempt it.

On that note don’t forget you can get early access to ordering the Hand Balancing Mastery Course by signing up for the VIP List at Hand Balancing VIP List

And you can win yourself a free copy by sending in your success story. Don’t forget to do it soon because the deadline for entries is midnight on Monday, November 19th.

Have fun with this one and until next time…

Good Luck and Good Hand Balancing,
Logan Christopher
Comments { 0 }

Handstand Hold for Time

Here is a great way to finish off your workouts whether you are doing just hand balancing or anything else by doing a handstand hold.

Its really simple, too.

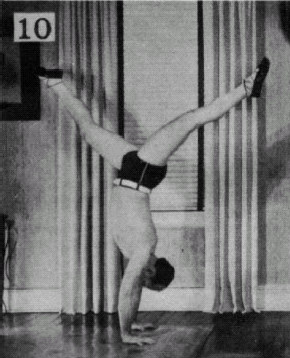
Just kick up into a handstand against the wall and hold it there for as long as you can. Try to stretch your toes upward and maintain good posture the whole time.

If you want you can even do a couple sets.

Handstand Hold Against Wall

This is great because it will build your endurance in your arms, shoulders, back, everywhere.

Learn How to Back Flip in 31 Days
Learn How to Back Flip in 31 Days on Amazon

As you steadily increase the amount of time you can hold a handstand you will find you get less fatigued when you practice your hand balancing.

It will test your mental toughness too. You can always stay up one more second if you really wanted to. A great way to finish off your training is to leave it all behind.

Good Luck and Good Handbalancing,

Logan Christopher

Comments { 1 }