About admin

Author Archive | admin

Walking on Hands

Here is a great question on the value of walking on hands versus standing on them.

“Hey Logan I just now started to do the frogstand and I can do it for a long time. I’ve been learning the handstand and couldn’t find my balance and I can walk all the way down my hall on my hands but I cant hold a handstand and Its frustrating so I stuck to walking on my hands. I’m gonna start practicing my frogstands right now. Is there any other things I could do to work on my balance for a handstand?”
Marcus

I recommend that anyone getting started with the handstand attempts to not walk around but instead finds the balance and holds the position on the hands.

You see, how you balance while walking on your hands can be entirely different then how you balance while standing on your hands. The first when you come out of balance you step to get back in balance. So your balance is maintained by moving around your body.

When standing on your hands you maintain your balance by keeping the body in a certain range that can be balanced by the hands and arms. If you start to fall out of balance you shift the pressure to keep your body up.

Doing this is tough. That’s why I recommend using lead-up stunts to teach you how to balance. The frogstand is great for teaching you hand balancing while in an easier position with your body low to the ground.

Other moves that help you build balance, different from the frog stand, include the headstand and forearm stand. If you can’t do these easier stunts well then you definitely should not be attempting the handstand yet.

Full details on these and other helpful stunts can be found in the Secrets of the Handstand Quick Start DVD.

Walking and Jumping On Your HandsWalking and Jumping On Your Hands on Amazon

Learning how to balance your body will in the end make walking around that much easier.

Good Luck and Good Hand Balancing,
Logan Christopher

Comments { 1 }

Handstand Pushup Book

The Ultimate Guide to Handstand Pushups is now available.

I know a number of you have been waiting for it, and for the launch you can get it now for $10 off the regular price.

Those who ordered during the pre-publication offer should already have their copies, or at least they are on the way.

For those of you that missed out, now’s your chance.

You can see the full details on handstand pushups here.

Trampoline Handbook
Trampoline Handbook on Amazon

Good Luck and Good Hand Balancing,
Logan Christopher

P.S. The main focus of this guide is one building strength, but Chapter 10 that covers the freestanding handstand pushup as well. Get your copy of The Ultimate Guide to Handstand Pushups.

Comments { 0 }

Handstand Tutorial

Here is a basic handstand tutorial. This will cover first practicing against a wall. If you are trying to go out into the open check out this article on how to do a hand stand.

Holding a handstand is not an easy skill. It requires much practice especially if you want to do it out in the open. The tips in the article will help you get started. Before we begin just know that practice is the biggest determinant of whether you’ll be successful or not with the handstand. The more you can practice the faster you’ll get results.

What you learn here will go a long way to helping you out. Also, these tips will ensure you get started with good habits which will set you up to learn even more advanced stunts later on. If you attempt the handstand without any instruction you may setup yourself for failure. Sure, you may figure out how to do the handstand but you may build bad habits which will make other hand balancing skills harder to do in the future.

The easiest way to learn the handstand is to first practice it against a wall. You’ll be able to learn proper body position first.

The first step is to kick-up into the handstand. In order to become successful you’ll need to build a good kick-up. So practice this skill by itself as much a you need to.

Kick-up to Handstand

Kick-up to Handstand

Get in a sprinter’s stance. Place both hands on the floor about shoulder width apart approximately 6-10 inches from the wall. One foot should be close to your body while the other is farther back. With the back leg you kick up and then bring the other leg to meet up with it against the wall. Kick enough to get yourself up into the handstand but not too much so that you slam into the wall.

Now lets focus on your form in the handstand. Spread the fingers wide apart and grip the ground. This will help especially with balancing later on.

Make sure your elbow are locked. If you bend your arms you’ll have to rely on your strength versus your body’s structure to hold you up. Also push your arms into the ground from the shoulder girdle. Think of trying to reach your shoulders to your ears. This will give you a better locked out position.

The rest of your body should remain tight as well from your back to the legs all the way to your toes. Point the toes and keep the legs together to help with this. By keeping tight you make holding the position, and balancing later on, much easier.

For most people some arch in the back is normal. There are different ways to go about it depending on the style of handstand you are going after. Just do whatever is comfortable for you as long as its not an excessive arch. But if you try to stretch your body upwards you’ll straighten a bit and get tighter.

You can keep your head neutral or tilt it back to look at the ground.

Handstand against Wall

Handstand against Wall

All the points for a good and stable handstand position are here. The goal is to create this same position every time you do a handstand whether against the wall or freestanding. Practice these steps enough until they are a habit every time you go into the handstand.

After you can hold this handstand for about a minute you can get started with a freestanding handstand, although there are a few other important lead-up stunts, like the headstand and frogstand, to work on to build up your abilities.

Learn How to Back Flip in 31 Days
Learn How to Back Flip in 31 Days on Amazon

Remember to keep practicing and you will succeed.

Good Luck and Good Hand Balancing,
Logan Christopher
P.S. For more on how to do the handstand check out the Secrets of the Handstand Quick Start DVD.

Comments { 0 }

Wrist Strengthening Exercises

An important part of handstands is having hand strength and flexibility so here are some wrist strengthening exercises.

I’ve always had some wrist troubles when it came to handstands due to an old injury. And recently my right wrist has been acting up making even a regular handstand hard to hold.

How have I been able to make progress towards overcoming this?

Tumbling Illustrated
Tumbling Illustrated on Amazon

By doing more handstands!

Because a handstand puts you near or at complete extension of your wrist it’s a position most people never really use or have need for strength in. But for those of us handbalancing that’s different.

Very few other exercises can even get close to this position. So using the handstand itself is the way we want to use to build wrist strength and flexibility.

Of course, if you are just starting out putting your full weight on your hands may be too hard. In this case going from pushups, to elevated pushups and finally to the handstand is the progression to follow. I had to go back to the starting point in order to build up.

It may be uncomfortable. The idea is to push your boundaries a little at a time. Keep doing a bit more each time to expand your wrist flexibility. Of course, you don’t want to push too hard you injure yourself even more. The idea is to make progress slowly and over time.

If its no strain to hold the position, when you are in the handstand (ideally against the wall) you can dig in and press down into the ground doing isometrics to further build your strength, and therefore control when balancing.

Regular practice with these kind of wrist strengthening exercises will result in strong, flexible and healthy hands and wrists.

Good Luck and Good Balancing,
Logan Christopher

P.S. There’s also some nifty stunts by Bob Jones in Chapter 6 of The True Art and Science of Hand Balancing. Be sure to check those out to further build strength and flexibility in those hand balancing hands.

Forearm Development from Various Hand Balancing Skills

Comments { 1 }

One Finger Handstand

Is a one finger handstand even possible?

Most would say that no human could possibly do this feat. But then most would agree Shaolin monks are anything but normal people!

This video shows a 91 year old monk Hal-tank from the Sil Lum Temple in China perform that feat.

As I’m sure you’ll agree this move goes beyond just finger strength, requiring intense focus of chi.

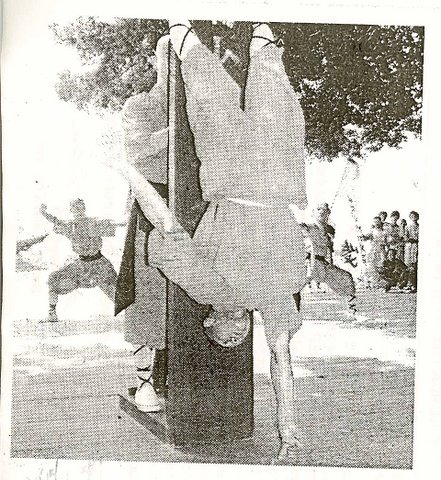
There are many other monks who have mastered a two finger handstand like this picture shows. Thanks to Gay Ng for sending it to me.

Two Finger Handstand by Shaolin Monk

Two Finger Handstand by Shaolin Monk

(You can also witness this feat from another Shaolin monk in the awesome DVD Shaolin: Wheel of Life available for cheap on Amazon.)

But getting down to a single finger handstand takes many more years of dedicated practice.

Its sure to be an entirely different approach but there’s a full chapter by Bob Jones, famous for his thumbstand, on doing fingertip pushups and handstands in The True Art and Science of Hand Balancing.

You can get started with the basics. Whether you’ll work up to two or one finger handstand like the monks do is up to you.

How to do the One Hand Handstand by Professor Orlick
ow to do the One Hand Handstand on Amazon

Good Luck and Good Hand Balancing,
Logan Christopher

Comments { 10 }

Scissors Handstand

After most people, myself included, have some success with the handstand they want to move on to a variety of stunts, most of which are much harder.

My advice, nowadays, is to stick with the handstand itself for a bit longer.

Yes, you can always just work on adding more time in a hold while improving your balance. But to spice it up a little bit try changing up your position.

There are a huge amount of different ways you can do this with different areas of your body. For today let’s focus on the legs.

Again, any possible way you can move your legs can be done in the handstand but let’s narrow it down to just one. The Scissors Handstand.

Tumbling Illustrated
Tumbling Illustrated on Amazon

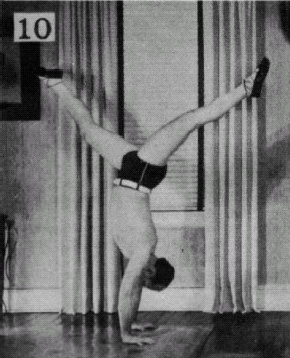
Scissors Handstand by Bob Jones
From The True Art and Science of Hand Balancing:

“Do a hand stand in nice form, then separate the legs, one backward and the other forward. Start the legs backward and forward in scissor fashion. Go slowly at first, and increase the speed, and come to a sudden stop with the feet and legs in nice form. While in the motion, the legs should be kept straight, with the toes pointed. This trick is very effective and is not hard to learn. Variations of the above are, scissors while walking on the hands, also scissors with the head forward through the arms.”

Check out the hand balancing book for many other moves just like this one.

Good Luck and Good Hand Balancing,
Logan Christopher

Comments { 0 }

Great Rings Routine

People that have never used the gymnastic rings may know they are difficult but it takes a try on them to truly grasp the strength it takes to do an impressive routine.

Hand Balancing Made EasyHandBalancingMadeEasy_on_Amazon

I came upon this video awhile back. It shows gymnast Andreas Aguilar at the 1991 World Professional Gymnastics Championships. Its most likely just an exhibition, rather then competing, due to the moves he performs.

Of particular note I want you to pay attention to the muscle up in the L-sit position. That may very well be one of the smoothest muscle ups ever. A far cry from the kipping action most athletes use.

There’s quite a few iron crosses and you’ll want to pay attention to the very unique dismount.

Good Luck and Good Ring Training,
Logan Christopher

P.S. Rings can build awesome strength and you can buy a set of gymnastic rings here.

Comments { 2 }

Building Handstand Strength

A great way to end any training is to work on your strength and endurance a bit. And in this instance I’m talking specifically about in the handstand.

Just kick-up against the wall and see how long you can hold it.

Hand Balancing Made EasyHandBalancingMadeEasy_on_Amazon

Not only does this help you train the position it will build strength for holding the handstand with or without the wall.

If you can do one minute you are getting somewhere.

If you can do two minutes you are doing awesome.

Anything beyond that and you may want to switch to one arm handstand holds. This will increase the resistance to build even more strength and endurance.

Wherever you’re at, every time you do this exercise again just try to add one second of time. If you fight for it, it won’t be difficult to do at all.

Whether you are doing a conventional type of workout or are just practicing your hand balancing this can be a great way to finish it off.

Good Luck and Good Hand Balancing,
Logan Christopher
P.S. Holding a handstand against the wall and balancing in the open are tow very different things. If you need help on the second check out the Secrets of the Handstand Quick Start DVD.

Comments { 0 }

Over and Underbalancing in a Handstand

“Hey Logan, just a short question on the handstand, how do you get control when you go towards under balancing ( I think…I’m new to all this, hehe)? Because when I over balance I just push the floor with my fingers, but when I under balance I just have no idea what to do.”

Thanks,
Sebastien V-G

“Hey Logan, I felt like trying a handstand today, and I tried it. I think I did pretty good, but before I can even hold it for more than a few seconds, I lose my balance and fall forwards. I have read most of the articles on this website, and I have tried the handstand again, but I still keep falling forward. Any Help?”
-Andrew

Thanks for the questions Sebastien and Andrew. They are common ones and are really all about what it takes to stay in the handstand.

To begin with if you are overbalancing you will press your fingertips into the floor. If you are underbalancing you can’t really press your palm into the floor, but you’ll want to raise your fingers up.

This old article has more details on the science of balancing.

There are also other methods of saving your balance whether its over or under. Read this article on shoulder weaving. As Bob Jones recommends this is not for beginners.

Learning this control whether by action of the hands or shoulders takes lots of practice. It’s a fine skill and will take time to develop or else everyone would be able to hold a handstand with ease.

That’s why I developed my Secrets of the Handstand Quick Start DVD. Using lead-up stunts will better help you to develop that balancing skill. And this review from Julia shows you why.

“Hi Logan, I appreciate your interest and support.  You probably have the best support system I’ve seen for people using your products.

“The DVD is great, and I think it’s a valuable tool for anybody who wants to have a strong and stable handstand.  I can really see the value of the lead-up stunts, and why a freestanding handstand is a bad idea until I get my frogstand under control.”

Thanks a lot!
-Julia

Tumbling Illustrated
Tumbling Illustrated on Amazon

If you can’t control you handstand for more than a few seconds check out the Secrets of the Handstand Quick Start DVD.

Good Luck and Good Hand Balancing,
Logan Christopher
Comments { 11 }

The X Balance

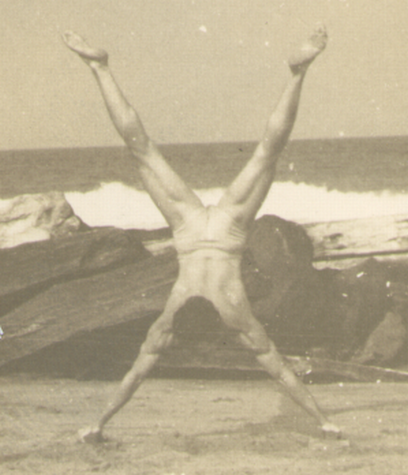
X Hand Balance

I love this picture. Just how the legs and arms line up to become a perfect X.

With the arms spread wide balancing becomes much more difficult. You won’t have the simple back and forth balancing like in a regular handstand as your hands are pointed towards the sides.

The quality is not the best but if you look closely you’ll notice Rafael’s hands are on little blocks. These may aid a little in balancing.

Just try an arms wide handstand with the hands out to the sides and you’ll find just how hard it can be to stay up.

Its these kind of balances that you rarely, if ever, see these days.

Good Luck and Good Hand Balancing,
Logan Christopher
Hand Balancing Made EasyHandBalancingMadeEasy_on_Amazon

P.S. For similar poses check out photos 44 and 95 in the Inspirational Photo Section of The True Art and Science of Handbalancing

Comments { 4 }