Archive | Handstands RSS feed for this section

How to do a Handstand for Kids

Every kid loves to kick up some dirt and spring into a handstand. It’s a fun way to release energy and show off a little bit for their friends. It’s important to make sure that when learning how to do a handstand for kids, both the child is comfortable and strong enough for the handstand and the adult is comfortable spotting for the handstand. Be sure that you’ve fully mastered the headstand with the child to ensure that they are properly conditioned in order to learn how to do a handstand without injury. Similarly, it is important to make sure that when teaching how to do a handstand for kids, you ensure the safety of both you and the child.

Beginning the Handstand

To begin instructing how to do a handstand for kids as the spotter, get down on one knee just off to the side of the child, near the head. Have the child get down on their hands and knees with their wrists beneath the shoulders, knees below hips. Sometimes it is useful to place a sticker, or a toy between their hands. This keeps their focus down onto the floor where it is needed in order to safely perform the handstand. Before the child begins, as the spotter, place your hand on/under their shoulder. There is a real possibility that the child’s elbows will buckle and they could fall onto their head. Having your hand in this position can help add support and prevent head and neck trauma in the event of a fall.

Going into the Handstand

Similar to the headstand, in order to go into the handstand, the child should bring one knee in towards their chest while extending the other. As the spotter, place your hand under the extended leg to assist. The child should then push off using the bent leg, lifting the extended leg, and bringing up the bent leg to meet it. If the child has trouble pulling their legs straight up and together, just work on the push off and bringing the legs together without worrying about getting the legs straight up. When you’re both comfortable, you can try for the fully extended handstand. Be sure to always provide proper support while the child is learning now to do the handstand.  Again, it is always important to ensure the safety of both you and the child.

Learn How to Back Flip in 31 Days
Learn How to Back Flip in 31 Days on Amazon

Posture during the full Handstand

Once you and the child are comfortable and they have lifted into a fully extended handstand, you can focus on the proper posture while holding the handstand. Be sure that both you and the child have your tummies tucked into your backbone. As the spotter, slide your hands up the length of the child as you straighten your knees to standing. Focus your support on their waist. At this point, you can add an element of fitness to the pose. The ‘straddle’ and the ‘pike’ are two fitness positions you can add on once the handstand has been mastered.

Comments { 0 }

Handstand Workout

The handstand workout that you do will completely depend on your skill level and what you’re looking to accomplish.

One that I did in the past was a circuit with seven exercises.

1 – Wall handstand
2 – Hamstring flexibility
3 – Frogstand to Headstand
4 – Straddle Lift
5 – Shoulder Flexibility
6 – Abdominal Compression
7 – Elbow Flexibility

Each exercise was done for about 30 seconds then you move onto the next one. This is a great beginner workout for handstands and also include flexibility work that is so important for all hand balancing.

Here is another example from a woman who does handstand professionally.

This handstand workout includes:

Tumbling Illustrated
Tumbling Illustrated on Amazon

1 – Straddle Presses
2 – Pike Presses
3 – Shoulder Weave towards Planche
4 – Handstand Shoulder Taps
5 – Straddle Presses with less range of motion
6 – Aerial

It was just one set of each exercise until fatigued here.

As mentioned what you’re working on and do in your workout will completely depend on your skill level and what you’re training for. Be sure to look around the website for more information that will give you plenty of handstand workout ideas.

For many more ideas on handstand workouts and exercises I recommend you pick up Handbalancing Made Easy.

Comments { 0 }

Handstand Balance Training

If you’re looking to improve you balance in the handstand this will be a great article for you.

I’m going to split it up into two subjects. One, is if you’re training to gain the balance just for the handstand itself, that is to be able to hold it stable for a length of time.

The second area is improving your balance by working on more difficult positions and moving between them.

Training Your Balance for the Handstand

In the first case I highly recommend you work on lead up stunts first. My Secrets of the Handstand Quick Start System shows you step by step what you need to do to achieve a 30 second handstand.

By working on moves like the frogstand, headstand, and forearm stand you’ll build up the ability you need. Then you transfer that to balancing right off the wall and finally out in the open.

Training your balance in these easier skills will get you to the handstand faster then just going straight for the handstand. This idea also carries over into the next place to go.

Intermediate and Advanced Handstand Balance Training

Once you have that stable handstand you can begin to move forward. Unfortunately when people learn the handstand (and even before it) they often look at the more difficult moves to go for next. Things like walking up and down stairs, doing presses or the one armer.

Ultimate Guide to Handstand Pushups
Ultimate Guide to Handstand Pushups on Amazon

Instead the best place to really improve your balance is by sticking with the handstand and changing your position slightly. This video will give you a few ideas to try.

Work on changing your back bend. Work on changing your leg position. Change your arm position or your head. All these are more difficult than the normal handstand position and thus are the best place to go for balance training.

If you’re looking for a whole lot more information I highly suggest picking up Hand Balancing Made Easy which has about 80 different handstand variations.

Comments { 0 }

How To Do a Handstand and Stay Up

Most of us dreaded gym class in school. One of the hardest tasks was learning how to do a handstand and stay up. Contrary to popular belief, you don’t need to be on the US Olympic Gymnastics team to perform a steady handstand. It takes patience, practice and good technique.

Tumbling Illustrated
Tumbling Illustrated on Amazon

This video shows getting up into a handstand from a yoga perspective. I’d approach it differently but there are some good tips here.


If you have never attempted a handstand before, have a friend hold your legs as you kick up into a handstand. You can also practice against a wall. Whichever route you choose, make sure to follow the same guidelines below on how to do a handstand and stay up:

  • Place your hands on the floor in front of you. Make sure they are about shoulder width apart. If you get too wide, you will fall and not have a good balance.
  • Another tip is to spread your fingers out to make a wider base. It is essential that you lock your elbows once you begin the handstand. This is crucial for a good platform.
  • Begin by placing your hands on the floor in front of you with your elbows locked.
  • Place your dominant leg forward and kick up into a handstand with your weaker leg.

You may need to practice doing a few kicks to get the right balance. If you are worried about falling over, try to use a softer surface to practice your handstand on. Grass is good to start. Once you are able to get yourself up into a vertical position, look at your hands to keep yourself balanced. Avoid moving your head around and keep your legs locked together. It is a good practice to point your toes to the sky. This helps your balance and presents a nicer image. Allowing your legs to dangle over your head is not a good technique because it could throw you off balance and it doesn’t look good. Use your palms for balance. If you start to fall forward, push with your fingers. If you find yourself falling backwards, push on your palm heels for balance. Staying up in the correct shape requires a lot of strength, which can be achieved through practice.

Finally, watch the video and take notes on things that you should not do if you want to stay up when doing a handstand. Like most things, it will take time and practice to know how to do a handstand and stay up.

Comments { 0 }

Handstand Drills

There are a whole lot of different handstand drills you’ll need to do depending on what you’re working on. In this article we’ll focus on specific drills that will help you to hold a better and more stable handstand position.

If you’re looking for different handstand drills just look around on the site. Check out the articles section or look at the specific categories you’re interested in in the sidebar.

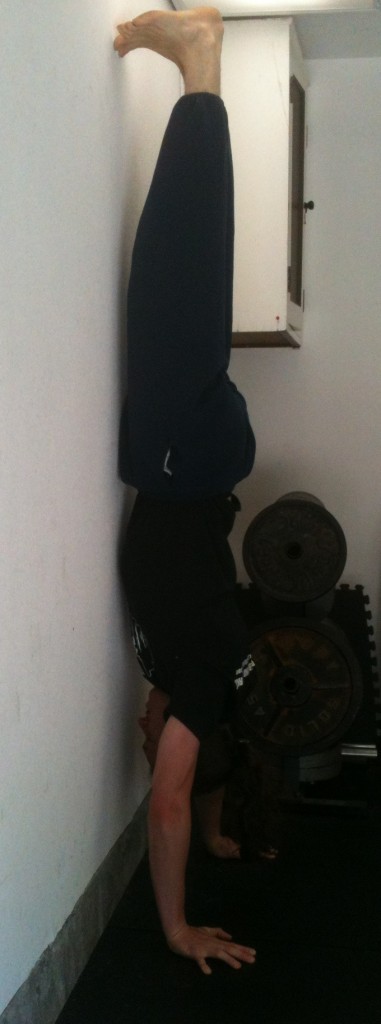
Wall Handstand

Kick-up or pressup against a wall and hold the position. Keep on working to increase your time

Reverse Wall Handstand

In the reverse handstand your chest will be facing the wall, instead of your back. Most people will find this position works the straight body handstand much better.

Headstand

Hand Balancing Made EasyHandBalancingMadeEasy_on_Amazon

The headstand can be used to train the body position and balancing, while giving the hands, arms and shoulders a rest.

Handstand Position Lying on the Floor

Simply lying on the floor and getting into a hollow position like you would for the handstand will get you use to getting into this position. Try it both on the stomach and on your back.

Kickup

This is not commonly practiced yet is a crucial part of the handstand. How you get into the handstand is almost as important as being able to hold it. This is because if you can’t kick up with the same amount of force each time, you won’t get into that sweet spot where you can even begin to balance with the hands.

Walking Across the Wall

Get into a handstand against the wall. This can be in the normal or reverse handstand position. Then walk from left to right and right to left while maintaining a strong handstand position.

Handstand Pushups

If you want to build strength, handstand pushups will do it. In the handstand bend your arms to lower down, then press back up. This can be made progressive for any strength level.

Handstand Shrugs

Once you’re in a handstand position you’ll want to shrug your shoulders up towards the ears. This is the normal position but in this exercise you unshrug and shrug again for reps. this helps to develop and build shoulder and scapula strength and control.

Flexibility Drills

The handstand takes a good amount of flexibility. Some particular areas you’ll want to focus on are the shoulders and elbows. In addition for other skills you’ll need hamstring and hip flexibility too.

If you’re looking to improve you handstand then doing a circuit of these, and other drills, will get you better.

For more ideas this video shows a number of gymnastic handstand drills done with small kids.

As you can see some, of these drills require another person, but many can be done yourself. The key point, when working on this straight body position is to make sure you’re there. This is done with a coach, or else at least setup a camera so you can check your position. Often times you’ll find you think you’re in the right position, but find that you’re not.

Too many people move onto more advanced skills without spending enough time on these basic handstand drills that form the foundation you must have if you want to go onto harder skills. (And yes I’ve made this mistake in the past as well.)

If you’re looking for a specific step-by-step system to achieve a freestanding handstand (and not necessarily in gymnastic style) check out the Secrets of the Handstand System.

Comments { 0 }

Handstand Benefits

There are many handstand benefits. For this article we’ll be splitting it up into doing the handstand against the wall and doing the handstand freestanding. I make no claims that this is an exhaustive list.

Reverse Handstand

The reverse handstand, one version of the wall handstand.

Wall Handstand Benefits

  • Builds a beginner level coordination and balance  – When you’re starting out a handstand can be tricky even though the wall is supporting you. When you get use to the position it will be easy, but that doesn’t mean it doesn’t give you coordination and balance that other people don’t have.
  • Great as a lead-up stunt to handstand pushups or freestanding handstands – Want to work up to harder stunts? You have to start here, and if you move past it too fast you’re doing yourself a disservice.
  • Teaches you proper body positioning for the handstand – No better way to work on that position you need then against the wall.
  • Shows you how to support your bodyweight on your hands – The handstand itself doesn’t take a whole lot of muscular strength. That’s because you rely more on your bone structure, but you have to learn how to use it properly.
  • Can be used to build shoulder flexibility – Especially if you’re going after a straight handstand you’re going to have to open up those shoulders. That can be done in the handstand itself.
  • Get the benefits of inversion – Inversion comes with a number of benefits according to the yogic tradition. Not only is it fun to spend time on your hands but its good for your health too.
sig-klein-handstand

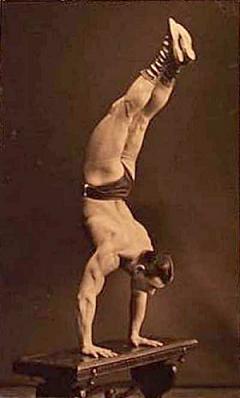
Sig Klein doing a Freestand Handstand

The True Art and Science of Hand Balancing
The True Art and Science of Hand Balancing on Amazon

Benefits of Freestanding Handstands

  • All of the above plus…
  • Builds a more advanced level coordination and balance – Unless you start as a child you’ll find that learning to stand on your hands is quite difficult. The balance required is big, compared to against a wall, not compared to a one hand handstand. For a lot more details on how to make it progressive check out my Secrets of the Handstand System.
  • The foundation needed for all other hand balancing movements – Don’t try to move onto handstand presses or walking on your hands without first building a good base. I recommend at least a 30 second hold in one stationary spot.
  • An impressive skill few people can do – To me the handstand is nothing, but when I’m out practicing people are always wowed by it. It’s served as a great conversation started in many cases, and you’re sure to get lots of friendly comments like “That’s awesome!” from being capable of doing this skill.
  • Strengthens the wrists and fingers – You need to learn how to balance with your hands and fingers. Those are the prime movers in keeping you in balance and they’ll become stronger (and more flexible) because of it.

So there we have it. At least ten different handstand benefits you can easily gain from practicing these skills. Want even more? Here are more benefits from hand balancing in general.

Comments { 0 }

Hand Balancing for Muscular Development

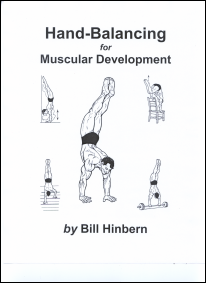
Hand Balancing for Muscular Development is a book written by Bill Hinbern on learning to do hand balancing.

This book was actually for first introduction to hand balancing and got me started a long time ago.

The book is dedicated to three people. Robert L. Jones. Professor Paulinetti. And Professor E.M. Orlick. No big surprise there. These men are three of the masters and teachers of many people through their books, all of which are available here at this website.

Learn How to Back Flip in 31 Days
Learn How to Back Flip in 31 Days on Amazon

In many ways this book is similar to Hand Balancing Made Easy by Prof. Orlick. Even the drawings are quite close, and a lot of the base building weighted and bodyweight exercises are the same.

In my opinion there is more information in any of the books available here over this one by Hinbern. There is more information on each exercise and a lot more discussion of how to build up to the exercises, rather then just this is how you do them.

What I do like about this book is it’s easy to use and broken up into beginner, intermediate and advanced exercises. It’s short, simple and sweet, clocking in at roughly 63 pages. And although the title speaks of muscular development, it’s not really the focus of the book.

If you’re looking for a complete library of hand balancing, which I think is a great idea, then I would certainly pick it up and add it to your collection.

This book is available here.

Hand Balancing for Muscular Development

Comments { 0 }

Yoga Handstands

In Yoga handstands make up one area that a lot of people avoid, because they can be much more difficult then any number of the other poses. But they should not be avoided. While it may take lots of practice you can learn how to do the handstand and other inverted poses.

It’s important to note that the handstand has been called the king of poses because of the benefits it brings. It strengthens the whole body, requires tremendous coordination, and it is an inversion which brings plenty of its own benefits.

Yoga Handstands

While not the best demonstation in the world, this video shows you what practicing handstands in yoga may look like (if you happen to be a very attractive female).

The handstand is not the first inversion or handbalancing pose you should work on. Far from it. There are a number of other poses that will build up your ability.

Pincha Mayurasana (Feathered Peacock Pose or commonly called the Forearm Stand)

Salamba Sirsasana (Supported Headstand)

Salamba Sarvangasana (Supported Shoulderstand)

Bakasana (Crane Pose)

Parsva Bakasana (Side Crane Pose)

Mayurasana (Peacock Pose)

Tolasana (Scale Pose)

And of course the handstand itself which is called Adho Mukha Vrksasana.

This is just like I teach in the Secrets of the Handstand System, and in fact some of the poses or drills are the same. If you want a step-by-step system to achieving the handstand check it out. Although its not geared toward yoga it will work just the same.

There are a number of variations of the handstand that can be done like the scorpion pose below, which adds extreme back flexibility into the mix. (Also note that the balance will actually be easier here then a straight bodied handstand as the center of gravity is lower.)

Scorpion Pose

So by working with the easier poses you’ll build up your balancing ability and control you need to hold the handstand. Once you’re there you can begin to go even further with your yoga handstands.

Hand Balancing Made EasyHandBalancingMadeEasy_on_Amazon
Comments { 0 }

York Hand Balancing Course

The York Hand Balancing Course was published by the York Barbell Company. There is no specific author, and I have found no information that states who actually wrote it. It starts off with the following:

DID YOU EVER NOTICE when you see a group of strong men together that, sooner or later, they take time out for some handbalancing? Handbalancing to a bodybuilder, a weightlifter or any barbell man, is as natural as a duck taking to water. I think one reason for this is the fact that barbell trained men are so much stronger than others that the difficult balancing stunts are to them very easy. Furthermore, lifting barbells has given them unusual co-ordination which is very necessary to the would-be balancer.

While this may have been true in the 40’s when this book was originally written, it is not anymore. Most weightlifters and bodybuilders couldn’t hold a handstand, even against the wall, if they tried. But with more realistic and functional training this is swinging back the other way.

And if you’re a weightlifter, bodybuilder, or train in any other manner there’s no reason you can’t also do the handstand, and much more advanced hand balancing tricks.

There is actually two York Hand Balancing Courses, number 1 and 2. If you want you can get both in one volume over at Amazon.

The first book covers beginner to intermediate hand balancing stunts and the second even more advanced material.

While it’s a great introduction to the material, it doesn’t go into the same depth as you’ll find in other places like The True Art and Science of Hand Balancing and Hand Balancing Made Easy.

Here’s a couple examples of what you’ll find inside the York course:

York Handstand Positions

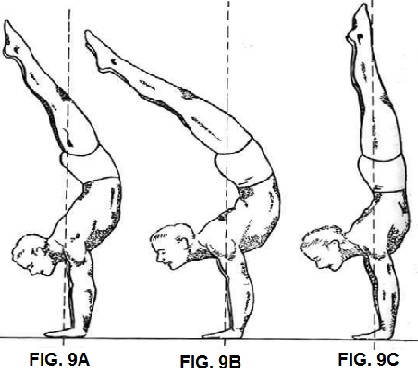
I HAVE OFTEN BEEN ASKED ; “just what does the perfect handstand look like?” There are many expert handbalancers and it seems that each one has a different idea on this. Some insist that it is only perfect when the normal back arch (the amount the same person would have if standing erect on his feet) is shown in the handstand position (see Fig. 9A). There are others who prefer a very deep arch claiming it is more graceful and requires less effort once mastered (see Fig. 9B). A third prevalent group insist that only the ‘Continental’ type of handstand is correct (see Fig. 9C). The ‘Continental’ allows practically no arch – the legs and lower part of the body in line with the arms.

Of course as this was written in the 40’s the handstands taught are the antique or classic style, and not the straight handstands that are common today in the circus or gymnastics. Even it’s continental handstand is not what is commonly taught these days. Nothing is wrong with these positions at all, but its not the place to go for a modern straight handstand.

Trampoline Handbook
Trampoline Handbook on Amazon

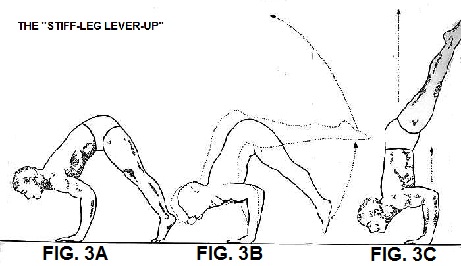
York Handstand Lever Up

YOU WON’T FIND MANY chaps who can do this lever-up. It takes plenty of strength and flexibility. The starting position for the stiff-arm-stiff-legged is shown on Page 4, Fig. 4A. Lean well forward, keep the elbows straight at all times and bring the feet as close to the hands as possible without bending the knees. The closer you can get your feet to your hands the easier the stunt . Keep leaning forward until the feet leave the floor (as indicated by the solid lines in Fig. 4B, Page 4) and continue to raise the legs (Fig. 4B, dotted lines) from the hips only. As your feet come into the vertical position (Fig. 4C) you will have to draw your shoulders and head back (that is; come back from the extreme forward position) until the complete handstand has been secured. You must have perfect control through-out the entire movement.

So the York Handbalancing book is a great place to get some ideas for hand balancing exercises, but is not the most in-depth or complete manual available today.

If you’re like me you’ll want every book on hand balancing in your library so it’s certainly worth picking up.

Comments { 0 }

Handstand Drills for Beginners

Skipping the basics is one of the biggest and most fundamental flaws when training to do a handstand, whether it is solo or with a trainer. Handstand drills for beginners are a very necessary part of training to be able to do a perfect handstand. Many gymnastic coaches seem to skip the fundamental basics of training drills. They seem to invoke the theory that, in order for their gymnast to be able to do a full handstand, they have to make them try out right for one, over and over until it’s right. Sadly, these coaches are doing their pupils a great disservice. The value of learning the basics, step by step, is something that is far too often underestimated.

How to do the One Hand Handstand by Professor Orlick
ow to do the One Hand Handstand on Amazon

Handstand drills for beginners help break down the handstand into the basic steps involved, making it easier to get the whole thing executed in full later. This is starting from the lunge into the handstand, building up into posture and muscle tension during the handstand and ending out with a flawless return to standing upright with triumph. By practicing each step individually using drills that break down the different parts of a handstand into simpler movements, you help strengthen the muscles a gymnast needs in fully accomplishing a handstand.

With the right practice and patience, you can go from basic lunge drills into a full and glorious handstand, with your arms fully extended, straight strong shoulders, a solid core, and extended legs with proper body and muscle tension throughout. Trying for the full handstand right off the bat can not only be more difficult, but it can lead to frustration or even injury without ever properly achieving a full handstand. Before you jump right into it, get yourself warmed up with some basic handstand drills for beginners. It’s smarter, safer and leads to more flawless handstands.

Comments { 0 }