Tag Archives | pike press

Handstand Push Ups – Guest Post by Al Kavadlo

You can train every muscle in your body without ever going to a gym or lifting weights, you just have to be creative!

The overhead press is one of the most fundamental strength training techniques out there – and for good reason. Overhead pressing is a great way to build upper-body strength as well as a strong core. Barbells and kettlebells are great for pressing, but no matter how strong you are, handstand push-ups are a unique challenge and must be treated as such. Get ready to flip the classic overhead press on its head – literally!

Pike Press
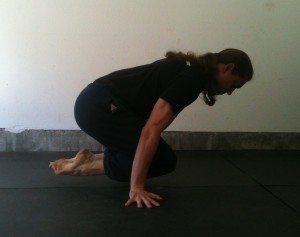
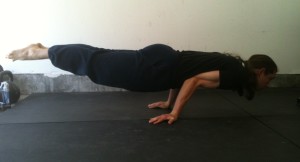
If you aren’t strong enough to do a handstand push-up yet, the pike press is a great way to ease in. Pike presses allow you to train the movement pattern without having to bear your entire body weight.

Rest your toes on a bench or step and get down in a push-up position. From here, walk your hands back toward the bench while you pike your hips up in the air over your shoulders. You will wind up looking like an upside-down letter L, with your body bent in half from the waist. Try to keep your back straight by taking the stretch in your hamstrings. You can bend your knees a little if you need to in order to keep your hips up over your shoulders. Lower yourself down until the top of your head touches the ground and then push yourself back up – that’s one rep.

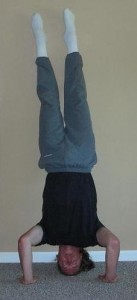
Wall Assisted Handstand Push-up

Once you can do ten consecutive pike presses without too much trouble, you’re ready to try a full handstand push-up against a wall. Kick up into a handstand with your back slightly arched and your fingers spread out. Engage your core muscles and keep your body tight as you lower yourself down and press yourself up. Make sure you touch your head to the ground on every rep to ensure a full range of motion. You can also try touching your nose to the floor instead of the top of your head to allow yourself to go a bit lower.

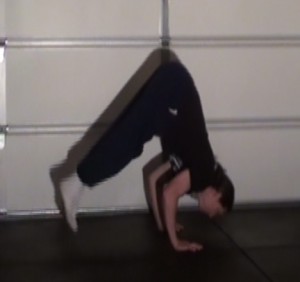
Handstand Push-ups on Parallettes

If you want a bigger range of motion for your handstand press, you’ve got a couple options. You could use a set of parallettes or you could set up two benches (or other sturdy objects) alongside each other with enough room for your head to fit in between. Any method that allows you to drop your head below your hands will add a new challenge to your handstand push-ups.

Freestanding Handstand Push-up

The freestanding handstand is a tricky move to get the hang of on its own, adding a push-up to it takes things to a whole other level!

The freestanding handstand push-up requires tremendous strength, balance and total body control, so before you think about training for this move, I suggest getting to the point where you can do at least ten wall assisted handstand push-ups and hold a freestanding handstand for a minimum of thirty seconds.

When performing handstand holds, I’ve often found it helpful to look in between my hands. With the freestanding handstand push-up however, I’ve found it better to look a few inches in front of my hands. Since the balance changes throughout the range of motion, I recommend practicing static holds at the bottom and middle positions of the range of motion to help train for this feat.

The One Arm Handstand Push-up

Often discussed, though never actually executed, the one arm handstand push-up is the holy grail of bodyweight strength training. In theory, the one arm handstand push-up is the ultimate calisthenics exercise. However, a full, clean rep has never been documented as far as I know. I have no doubt that someone will eventually perform one (and get it on video), but in the meantime the rest of us will just continue to train hard and keep the dream alive.

Watch the video below for more:

For more from Al Kavadlo check out his website here. He is the author of several books Pushing the Limits!, Raising the Bar and his newest book Stretching Your Boundaries, as well as the head instructor of the Progressive Calisthenics Certification.


Learn How to Back Flip in 31 Days
Learn How to Back Flip in 31 Days on Amazon
Comments { 0 }

10 Progressive Bent Arm Handstand Presses

Bent arm handstand presses, of the various sorts we’ll cover below, are an awesome show of strength and skill.

The hard part about that is that they require lots of strength and lots of skill to do. That’s probably part of the allure, but it is also what makes them unattainable for most, unless they spend the dedicated practice required.

The difficult part of the skill equation is that you must balance the whole time while doing these. They’re a far cry from doing handstand pushups against the wall. I would recommend to anyone that really wants to get great at these, to spend your time building a solid free handstand first. I would say until you can hold a handstand consistently for at least 20 seconds that you should build your strength another way, as you focus on that skill. (On that note, my Secrets of the Handstand System will help you get there.)

The difficult part of the strength equation is that they have you handle your entire bodyweight with your upper body strength. If you’re a hundred pound gymnast this may not be a big problem. For the rest of us it is.

I remember working on the frogstand press early in my hand balancing career. Not only was the balance hard but each rep was like a max effort press. This makes it hard to work on the “skill” of the movement when it takes everything you’ve got to do it. And it limits the total reps you can do for practice, whether you make them or not.

All bodyweight exercises need to be progressive. That’s one of the hard parts about these. There is no clear progression. You can’t just unload your bodyweight unfortunately. So what I’ve set out to do in this article is give you ten progressively harder presses to work with.

Note: These are all BENT ARM presses. Straight arm presses are an entirely different animal, requiring more flexibility as well as a different kind of strength to do.

We start with the easiest one. Of course to do this you need to have a minimum of strength and balance. We talked about the balance part. As for strength I would recommend being able to do at least 5 handstand pushups against the wall before starting here.

The order of this list is open for some debate. Due to leverages and other factors some people may find that certain skills are easier than others. But I’ve worked with this awhile to find that it works well for me and others I‘ve trained.

1. Frogstand Press

The frogstand is known by a few different names like the crow in yoga. it’s a basic hand balancing skill that can help you on working towards the handstand. So on that note, its great that its also, the starting place for the bent arm presses. From a frogstand, with the knees on the outsides/backs of the elbows, tip forward more and press up into the handstand.

2. Straddle Press

Usually the straddle press is done with the arms locked out, but that doesn’t mean it can’t also be used in a bent arm variation. Spread your legs fairly wide with the hands placed on the ground. Bend the elbows, taking your full weight onto the hands. Bring the legs around and up as you push up into a handstand.

3. Headstand Pushup

Start in a tripod headstand position with your legs straight overhead. From here press up with the hands until you come to a handstand. To make the press a little easier put the hands a little wider than shoulder width.

Headstand

The starting position for this press.

How to do the One Hand Handstand by Professor Orlick
ow to do the One Hand Handstand on Amazon

4. Pike Press

Similar to the straddle press, the only difference in this movement is that you’re legs are kept straight and together. This decreases your leverage, forcing you to counterbalance out further and makes it harder to do.

Bent Arm Pike Press

Just after the start when the legs raise off the ground.

5. Handstand Pushup

Kick up into a handstand with the hands shoulder width apart. Lower down touching your nose to the ground and press back up. This can be done with a straight or a curved back, they just change the angle of the press slightly.

6. Tuck Press

Start sitting on your knees (seiza position) on the ground. Press your arms into the ground lifting your body off. Tilt forward, bending the arms then press all the way up to a handstand. This move forces you into a lower starting place and is thus harder to do.

The starting position of the tuck pressup.

The starting position of the tuck pressup.

7. Belly Roll Pressup

There is some skill involved in this movement. You need to learn how to use your momentum and make a good transition as you do it. This is best to do on a padded surface. Start on your knees with the hips straight. Roll forward, arching the back. Your hands will come touch the ground above your hips. Use the momentum to help you press up into the handstand.

One of the steps in the belly roll to handstand.

8. Tiger Bend

Start in a forearm stand, that is balanced across the length of your forearms and hands. This requires a curved back position. Shift your weight forward so that you can come onto the hands in the bottom of a freestanding handstand pushup position. Press up. This requires a more narrow stance of the hands and thus requires significantly more strength.

9. Elbow Lever Press

Start in an elbow lever position with the body held horizontal over the ground your weight resting fully on the elbows. Raise the legs up as you start to press with the hands. The hands will need to rotate on the ground to move towards a regular position as you press up.

Elbow Lever

From here press up to a handstand, rotating your hands along the way.

10. Prone Press

Start laying on the ground stomach down. Place your hands by your hips. Lift your whole body and press up to a handstand in much the same way as the lever press. Since you’re starting lower and must support your entire weight, without the elbow support, this one is quite a bit tougher.

This list was made to exist without any tools, like stacked objects or handles. With those added in, you could build out the list a lot further. Also there can be more intermediate steps like playing with hand width more to make each move more or less difficult.

Also note I have not yet personally achieved steps 9 and 10. As I work more towards these I may find some better intermediary steps.

Comments { 1 }