Clutch Flag

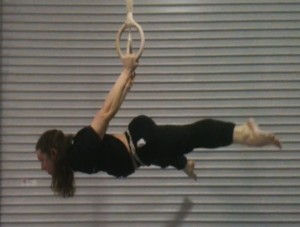
Been having lots of fun in my recent park workouts. Here is a video on me doing a Clutch Flag.

Clutch Flag

To be honest, I had never seen nor heard of this version of the human flag, until I read Convict Conditioning 2.

Anyone with a good level of strength should be capable of doing the clutch flag with a small amount of work. It is recommended to master this movement before you even move into the human flag (called press flag in that book). I think this is very sound advice.

The basics of it are to wedge one elbow (the lower arm) into the hip. This helps support the body. The other arm wraps around the bar and pulls back, while you lever out your body.

The True Art and Science of Hand Balancing
The True Art and Science of Hand Balancing on Amazon

Because you’re wrapped around the bar, and don’t have your arms extended, the leverage of this movement is way easier. Yet you still need to control your body in this side levering movement, and you can even get use to your body wanting to turn or sway in the air.

My friend and I plan on building up the time in this movement to at least 20 seconds before we really get started on the human flag. That’s of course for both sides. I feel a little stronger on the side shown in the video (I guess I’ll call that the right side) but not too far behind with the other.

It should go without saying that to practice this move, be sure you’re on a steady bar that can support your weight and will not topple over. Sign posts, swings sets, basketball poles and much more will work.

And this move is uncomfortable in the beginning. It can hurt a little to grab the bar as you tense up completely against it. Yet after a few days working on this, while I wouldn’t call it comfortable, it is manageable at this point.

I haven’t done a full review on Convict Conditioning 2 yet, but if you’ve like to read the original Convict Conditioning review its still one of the most popular posts on my site.

The clutch flag is also a very different movement from the shoulder flag which I learned from the Tapp Brothers in their course. When I use to think of the human flag as one movement, its clear there are many routes and similar, yet easier, movements to work on.

Comments { 5 }

First Back Lever

I was “playing” at the park yesterday with my friend. Great to always have a camera on hand.

Here I was able to hold my first back lever with legs straight but also together.

Check off one major goal for this year!

Trampoline Handbook
Trampoline Handbook on Amazon

Compare this to my earlier straddle back levers.

Straddle Back Lever

The crazy thing is I haven’t even been working on this skill lately. I have been working towards one arm pullups and a number of exercises with the Power Wheel to strength the abs. I guess those two things are carrying over. I also noticed I was better at various front lever progressions we worked on.

I also think that it may have been a little easier on these monkey bars, over the rings that I’ve normally done them on. But then I did another back lever, possibly even better then this one, on some rings they had there a little later. Sorry, no video of this one but I will have lots more from the park in coming weeks and months.

Comments { 6 }

Tuck to Advanced Tuck Planche

I received the following question from Gary regarding moving from the tuck to advanced tuck planche.

Thanks for all your good advice and tutorials.
Can you help me as I am trying at the moment to go from tuck planche to advanced tuck planche, (sure you have had this question a few times.) I am really struggling with any progress and wondered if there was any tips you knew that may help me along.

This video here describes tips on how to this step of planche training.

The tuck planche involves straight arms and holding your body aloft.

The next step involves making it one step closer to the advanced tuck planche. I originally learned of this as one step in planche progressions from Coach Sommer in this article here. Check it out for more ideas. This includes:

1. Bringing your Shoulders Forward

Bringing your shoulders forward places additional stress on them as the leveraged position is harder to hold. As you progress in teh various planche moves you’re moving more and more forward, requiring more and more strength.

2. Straighten the Back

This one is closely tied into the next one. In fact all three of these are tied together. Straightening the back tends to make you need to raise the hips and move the shoulders forward. A back that is straight (even arched a little) and parallel to the floor is the position you’ll be holding for all future planche progressions.

The True Art and Science of Hand Balancing
The True Art and Science of Hand Balancing on Amazon

3. Raise the Hips

The hips should be raised up to shoulder level. In the regular tuck planche the hips are low but this is the main point in moving to the advanced tuck planche. As you raise the hips its natural for the legs to start to untuck. When starting out make sure to keep them tucked but as you improve levering them out is the next step.

I didn’t make it completely clear in the video. Think of these three areas as places you can focus on and start the movement from, but recognize that they are all related.

The planche is a truly difficult move and will take a long time to master. With these moves be content to add a second here, or a slightly better position there. Small improvements over time lead to amazing moves.

For much more on planching as well as all forms of hand balancing consult the Hand Balancing Mastery Course.

Comments { 6 }

Bar Kip Tutorial

Over the years I’ve only done a little bit of bar work. I remember one day back in gymnastics I decided to try out the bar kip. The other people there told me how to do it and in a couple tries I had it down.

The True Art and Science of Hand Balancing
The True Art and Science of Hand Balancing on Amazon

This video shows you how its done.

To do the bar kip you need to learn how to use your body. Its not so much a strength move (though a foundation of strength is necessary) but learning how to divert your force when and where needed. You need to be tight at certain parts and explode in others.

Though the end result is being over the bar, this is different than a muscle up, done on the bar. That is more of a pullup or bent arm exercise into the position, even if kipping is used to aid in the movement, while this is straight armed mostly and done completely with body momentum. Of course both are great, just different applications. Actually now that I think about it, you’d probably get benefit in training both of these, in order to improve both to some degree.

If you want more from the Tapp Brothers I recommend checking out their Parkour Crash Course or How to do the Backflip.

Comments { 0 }

Amazing Hand Balancing Video

Here’s another video of an amazing hand balancer.

Trampoline Handbook
Trampoline Handbook on Amazon

  • The video starts off with 15 straddle L presses to handstand.
  • This is followed by 10 handstand pushups, a half pirouette, then 3 more.
  • Using rotating hand balancing stands a series of elbow lever press to handstands.
  • Front and side splits (including extended).
  • One arm handstands in a variety of positions on the floor and on stands.
  • This is followed by one arm presses and hopping from hand to hand.
  • I don’t think I’ve ever seen the move at the 5:30 mark before (it has to be way harder then the straddle version)
  • A variety of walking, holds, human flag, the grand arch and much more.
  • And it ends with one of the most visually appealing hand balancing stunts.

Hand balancing is not a lost art to this individual. Thanks to Mark for sending me this video.

Good Luck and Good Hand Balancing,
Logan Christopher

Comments { 3 }

Frogstand Press Static Hold

Here’s a new video that gives you another tip on training the bent arm pressing, specifically the frogstand press, though this applies to them all.

Ultimate Guide to Handstand Pushups
Ultimate Guide to Handstand Pushups on Amazon

This involves using static holds to build strength and control your press. You must have the strength to hold each portion of the handstand press to really control the movement. This will aid in your ability to smoothly get up to the handstand.

You can find out much more about bent arm pressing in the Hand Balancing Mastery Course.

Good Luck and Good Hand Balancing,
Logan Christopher

Comments { 1 }

Bent Arm Pressing

Here’s a new video that gives you a tip on training the bent arm pressing, specifically the bent arm straddle press is shown. Of course this would work equally well with any other press.

Ultimate Guide to Handstand Pushups
Ultimate Guide to Handstand Pushups on Amazon

You can find out much more about bent arm pressing in the Hand Balancing Mastery Course.

Good Luck and Good Hand Balancing,
Logan Christopher

Comments { 0 }

6 Steps to Mastery?

I’ve been practicing my hand balancing a lot more lately working on some new moves.

Walking and Jumping On Your HandsWalking and Jumping On Your Hands on Amazon

Its fun to see the difference between just working towards a new move for the first time and one that you have mastery of. In fact, just looking at this model I came up with 6 steps between the two (7 if you count zero ground).

0 – This is where you can’t do the move

As much as we want to, there are seldom times that we start off being capable of doing many exercises. No one is born with the ability to stand on their hands (heck, they can’t even stand on their two feet without much trial and error). But you go through the process and eventually gain the skills.

There are a whole bunch of progressions and steps you’ll be working on in order to work up to the given move. Like doing the lead-up stunts will accelerate you reaching the next step in the handstand. Full details can be found in the Secrets of the Handstand Quick Start.

1 – Shakily doing it first time

Wow! Isn’t it amazing the first time you accomplish something you’ve been working on for sometime. But chances are that first success is a bit ugly. Your form isn’t perfect, you might not have exactly the right position, but dammit it was close enough to count. It’s a success in my book.

I remember the first time I hit an aerial. By no means was it perfect and flawless. I used tons of speed ion the takeoff and my landing was low and not in optimal position. But I did do it.

2 – Solidly doing it first time

After you’ve done that first shaky rep or hold, the next time you come back to the gym you will progress to something that is more solid. A better hold or a better looking execution. While some people may have doubted your first rep, there is no doubt here. You’re on your way.

When I was working on the back lever in a straddle I was getting close for sometime. Then one day I hit truly parallel and held for about three seconds. I was elated.

Straddle Back Lever

3 – Being able to do it several times.

Now that you’ve got a couple reps or holds under your belt its time to increase the volume. Many times when you hit something for the first time, you only manage one of that day. Sometimes you hit a genuine breakthrough and can all of a sudden skip to this step. Now you do several successful attempts at the exercise in one workout.

4 – Being able to consistently do it.

If it’s a tough move you may not hit it every single day you try. Some days you’re “on” and some days you’re “off”. But at level you’re consistently hitting it all the time, possibly after some warmup drills or lead-up stunts. Along with this your performance improves and your volume increases ever higher.

I’ve started working on a number of bent arm handstand presses recently. In the past my freestanding handstand pushups have been hit or miss. Now they are becoming consistent. Want to learn the steps I used? They can be found in a bonus chapter here.

5 – Doing it any time you desire

Eventually you come to the point where you own the movement. You can do it anytime. Fatigue doesn’t matter. If you were woken up out of bed in the morning, you’d still be able to do the exercise. In your training you’re increasing your timed holds big time or pumping out the reps.

6 – Mastering it and moving onwards

Beyond owning the movement you look to the next step. How can you make this movement harder? What else can you do that will take you to the next level? Basically, where are you going next that will start this process all over?

As my mentor says, “Do the drills and get the skills.” This applies to everything and with this model you may see what you’re working on in new light. Plus if you look between the lines there’s some training tips found within.

Good Luck and Good Hand Balancing,
Logan Christopher

P.S. With my increase in hand balancing practice I’ll have a lot more to write about and share with you, including new courses coming down the line. Stay tuned.

Comments { 0 }

Damien Walters 2011

This video was just released today. It features Damien Walters, one of the greatest acrobats and free runners alive today.

Walking and Jumping On Your HandsWalking and Jumping On Your Hands on Amazon

Want to see more? Check out these two videos as well.

Damien Walters 2010
Damien Walters 2009

To get to this level you’ll need lots of practice. Having a facility like his wouldn’t hurt either. And professional coaching would be best.

But to get you started I’d recommend this Tumbling book and Parkour Crash Course.

Comments { 5 }

Air Force Crew

Check out this video of break dancers Air Force Crew.

I had the opportunity to see these guys perform live at a conference. I’ve never worked on breakdancing moves specifically but probably will some day. There is lots of similarities between this and other acrobatic arts.

The True Art and Science of Hand Balancing
The True Art and Science of Hand Balancing on Amazon
Comments { 0 }