Archive | Handstands RSS feed for this section

Handstand Kickover

Doing a handstand kickover is fun and at the same time a smart choice of exercise.  However, it is not that easy to do as it may cause injuries especially if you do not know the basic steps. In this sense, it is necessary to know how to obtain a graceful and steady handstand.

Basic Steps of Handstand Kickover:

  • Find a wide and soft area. If you want to practice the move, the first thing to consider is finding a wide and safe area that ensures softer landing. This activity will make you fall most of the time so it is necessary to protect yourself from injury.
  • Stretch. Before starting, it is necessary to do some stretching such as rolling your neck, ankles and wrists. This will reduce the risk of getting injured and at the same time, these stretching exercises will make you more flexible.
  • Stand straight up lifting your hands over your head. Keeping your arms straight is crucial, then step forward, throw hands down and do the kick.
  • Kick one leg and take a forward step. When doing it, you should ensure that the skeletal system can handle or endure the load of your body. Thus, you should keep your fingertips align with your back foot.

Aside from the basic steps mentioned, you should also ensure proper balance of the body. Otherwise, it may lead to injury once you make a mistake in throwing your hands and kicking your legs. Likewise, while approaching the ground, always keep your arms straight. Keeping your arms and elbows bended can injure you.

Performing this handstand is not a piece of cake so you need someone to assist you if it’s your first time. If you are a beginner on doing handstands, this is not recommended for you. You should be able to do a handstand for two seconds, and a standing back bend before you can practice doing handstand kickover moves.

If you want to learn a lot more on bridging movements like this be sure to check out the Advanced Bridging Course.

Trampoline Handbook
Trampoline Handbook on Amazon
Comments { 0 }

Lsit to Shoulder Stand

Here’s a fairly easy hand balancing skill you can practice. Its called the Lsit to Shoulder Stand.

To start with I recommend two solid platforms to keep your hands on that are raised from the ground. Big kettlebells work great for this too.

Start in an L position then tuck your legs, tip your shoulders forward and come to the shoulder stand. Then reverse it.

You can make this exercise harder by:

Walking and Jumping On Your HandsWalking and Jumping On Your Hands on Amazon

1) Doing more reps
2) Longer holds in any of the positions
3) Try it on the ground like this handstand from sitting.
4) Pressing up to a complete handstand from the shoulder stand.

Comments { 7 }

Offset Press Handstand

Recently I covered the variation known as the shoulder stand, that’s different from the common shoulder stand.

This move builds on top of that. Instead of both hands flat one is raised higher then the other.

You can hold this position.

Or you can then do an offset press up into a one arm handstand with support.

Trampoline Handbook
Trampoline Handbook on Amazon

Its a fun move to try.

Comments { 1 }

Shoulder Stand

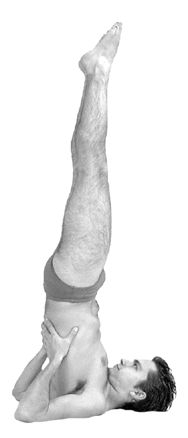
The shoulder stand is a name for a movement pictured below.

Learn How to Back Flip in 31 Days
Learn How to Back Flip in 31 Days on Amazon

Shoulder Stand

However it’s also the name for the bottom of a press position as you’ll learn in this video here.

This is a great move for several purposes.

1. Strengthens the arms and shoulders. You’re holding a position that can be tough. Although your arms are fully bent and touching which allows you to support some weight they still must isometrically fire to hold you in position.

2. Strengthens the abdominals. This can be increased by raising and lowering the legs into position.

3. Works your balance. The hands must work to keep you balanced. Since it’s a lower center of gravity then the handstand, it’s usually easier to hold this position. It would make another great lead-up stunt for the handstand for that reason.

Secrets of the Handstand 3.0 is coming soon!

Comments { 5 }

Work on Straight Handstands

I’m going to try showing more of my regular practice up here on the blog. One of the biggest focuses lately has been straight handstands.

Learn How to Back Flip in 31 Days
Learn How to Back Flip in 31 Days on Amazon

Instead of kicking up, there is a jump up through a tucked position to the handstand. As you can see my body still is curved, but this wasn’t the best example. Body position and balance is improving.

Read more about straight handstands here.

Comments { 0 }

Living Life in a Handstand Part 2

This is the second in a new series that shows an average day life, except that the person gets around while in a handstand. This is from Tim “Livewire” Shieff a famous freerunner.

The True Art and Science of Hand Balancing
The True Art and Science of Hand Balancing on Amazon

There’s tons of walking around on the hands here, accompanied by a dog. You also have to admire some of the transitions into and out of the handstands.

The part with the dog poop is a bit much, but a great shot into the trash can. 🙂

Make sure you check out the other videos in this series below.

Comments { 1 }

Living Life in a Handstand

This is the first in a new series that shows an average day life, except that the person gets around while in a handstand. This is from Tim “Livewire” Shieff a famous freerunner.

It starts off with a forearm stand.

There’s lot of walking on the hands.

A bit of a supported one armer as he pays to get in the station.

Riding down the escalator, and taking a few downward steps at the end too. He covers a flight of stairs a little later on.

Finally he holds a stable handstand inside the departing subway train. Considering they tell you to hold onto the rails if you’re standing, this probably is much harder then it looks.

I wondering how the backpack may have made this slightly easier by lowering his center of gravity.

I can’t say for sure as I wasn’t there, but this was most likely just done shot at a time. Is anyone else interested in trying something like this? To do the whole thing in one shot would be truly legendary.

How to do the One Hand Handstand by Professor Orlick
ow to do the One Hand Handstand on Amazon
Comments { 16 }

Handstand Underwater

The first time I heard about doing handstand underwater I didn’t think it was a good idea. But since then I’ve changed my mind.

Let’s look at some of the benefits and drawbacks.

Why should you do handstands underwater? The balance will be easier. Because the water has a greater resistance then the air your body will not fall out of position as quickly and you’ll have an easier time correcting it.

This can also be made progressive by having your body less and less underwater. In the beginning, if you have a pool deep enough you can be completely submerged, but as you improve your legs will stick out more. This is where a nice sloping pool would come in handy.

The main drawback I see is that you won’t be able to breathe, so unless you’re also working to improve how long you can hold your breath you won’t last too long.

Also you have to be careful to still maintain all the body position and everything you’re going for with an underwater handstand, like you would in a real handstand.

Tumbling Illustrated
Tumbling Illustrated on Amazon

So yes you can add in underwater handstands to how you practice but I wouldn’t make it the only thing you do. For more info be sure to check out my handstand getting system.

Comments { 4 }

Handstand Endurance

When it comes to handstand endurance there are probably two different things you want to shoot for.

Learn How to Back Flip in 31 Days
Learn How to Back Flip in 31 Days on Amazon

The first is to hold a handstand against the wall for as long as you can.

Without having to balance you can just focus on building your body’s ability to sustain that position. By doing this you’re building endurance that certainly can transfer over to doing freestanding handstands.

Another aspect of this is that you’ll be able to practice more, because each move won’t be as fatiguing as before when you build up your endurance.

The second way is to work on holding a handstand for longer and longer periods of time out in the open. Here’s a rather boring video showing this in action.

Now a handstand of about a minute and twenty seconds is no world record, though it is far better then most people can manage.

I would also caution you if you’re trying to build up your skill and endurance that it is far better to stand in one place. I also came across this video of a handstand endurance competition, but these people are walking all over the place on their hands.

Comments { 0 }

Handstand Clap Pushup

The handstand clap pushup is an amazing skill. In this post you’ll learn about and see a couple different ways to do it.

Although it’s called a “pushup” the truth is the easiest way to do it is to not really do a pushup. By generating a jumping action from the feet you can launch yourself into the air, clap, and then land back in the handstand.

Here is a good example of that. There is only a slight bend in the arms before launching and when landing.

Tumbling Illustrated
Tumbling Illustrated on Amazon

Contrast that to this one. Here the jump is generated fully from the legs, but it is not caught in a handstand position or even close to it. The guy ends up in basically the bottom of the handstand pushup and must press back up.

Now here is where it truly becomes handstand pushup with claps and not just a jumping handstand with a clap. Not only does he not use the legs at all but he manages several reps in a row.

These strict handstand clap pushups are tough to do. Even the earlier version are going to be outside the realm of what most people can manage.

To work up to this skill I would recommend:

1) Learn how to hold a stable handstand.
2) Build handstand pushup strength.
3) Learn how to jump with your hands (if you’re going for that version).
4) Build a lot more handstand pushup strength (for the strict version).

Comments { 0 }