Archive | Acrobatics RSS feed for this section

Autoregulation – A Framework for Building Skill

In a previous post, I covered overcoming hurdles and changing things up. I even discussed an interesting buzzword; autoregulation.

The True Art and Science of Hand Balancing
The True Art and Science of Hand Balancing on Amazon

I didn’t want to get too deep into autoregulation at that point because I wanted to keep things simple. Although I think today is a perfect time to discuss what this whole autoregulation thing is about.

Autoregulation in its base training terms means to adjust the training session to the body’s needs at that point in time. First off let me say that this doesn’t mean to jump into every session without a plan and guns shooting. That is off course from what we are looking for in our own training, although having time to play while you train has its merits.
What we are talking about is having an adjustable framework to work from.
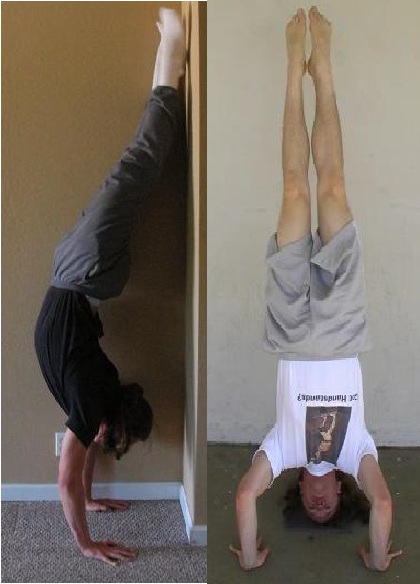
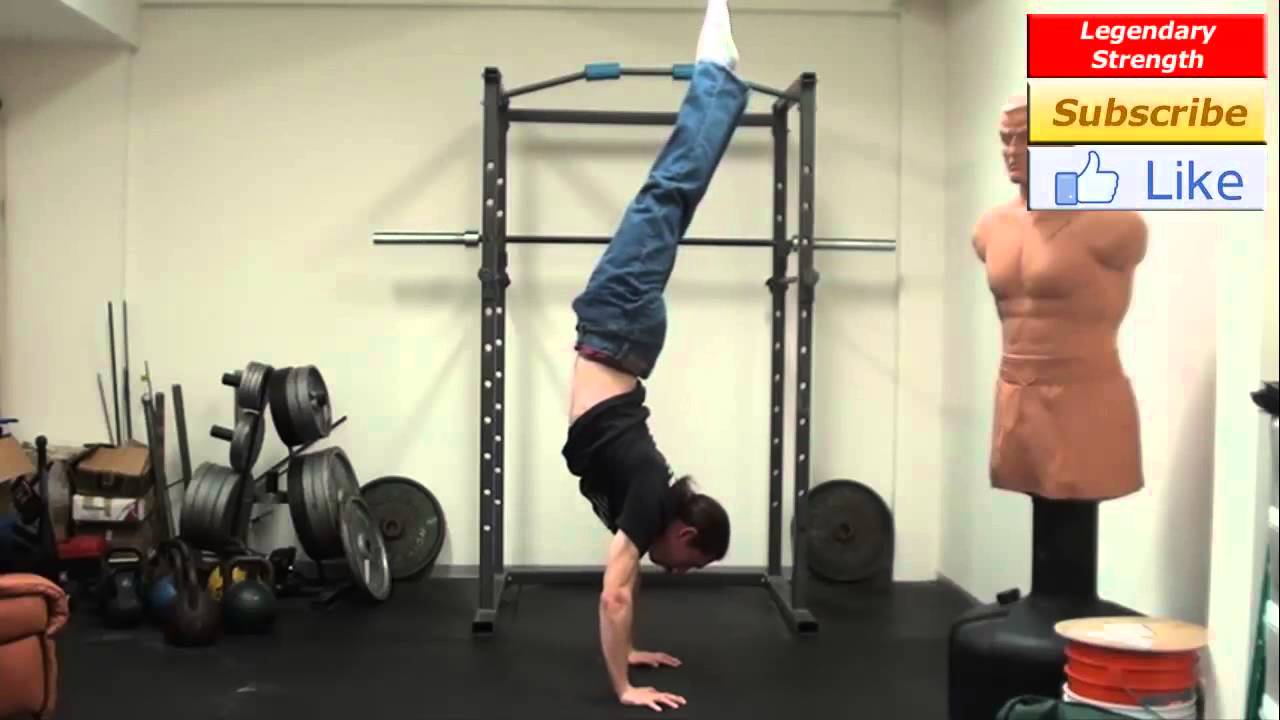
Lets take our wall assisted handstand as an example. To add to this, lets set a simple baseline to follow while your understanding this method. There are many methods to autoregulation including those from our friends at Gold Medal Bodies.
To start off, lets take the ideas of quality, quantity, and time. Say that our chosen training activity, the wall assisted handstand, will be given a time frame of 20 minutes. In that 10 minute time frame, I set a goal(quantity) of a 30 second handstand with a quality of a controlled kick-up lightly touching the wall and straight line. I have an added base point of stopping after not being able to hold a quality 20 second handstand even if its before the 20 minute time frame ends.
So what I’ve done is set up some “soft” parameters that i can play with in order to adjust my body accordingly to the task. This is important when building a skill, because you are learning to utilize your body. We have the added biological mess, that your bodies current state is a result of stimuli received previously.
You can look up more on the subject by doing a quick google search. But if you want to get a tasted of auto-regulated skill training, test out one of the many Gold Medal Bodies training programs.

Stay Inverted!
-Jonathan Magno

Comments { 0 }

Do you Roll Forward or Reverse Engineer it?

Rolling on the floor. It seems like a simple task. But many people seem to have a tough time with it. The simplest reason why is because they dive straight into it without the right body feel.

When somebody is  initially taught the roll, they start off in a kneeling position, and the first point of contact tends to be their shoulder. Following the contact with the shoulder the next point of contact tends to be the lower back or rump. This is usually exemplified by a large thump or possible yell.

So why does this occur? The two culprits are body kinesthetic and flexibility. When a person is rolling they need to be able to feel the connection of their back to the floor. On top of that, they need to be flexible enough to round out their back to create the shape necessary to roll.

Where does a person start to gain the tools necessary. They should begin at the point of contact that most of the issues occur. That point would be the mid-back. Build the right body feel and flexibility in that area and the roll will be an easy task.

A great example on building this body feel comes from Ryan Hurst of GMB Fitness.  Below, he demonstrates a set of progressions that you can use to develop the right feel to easily develop your rolling skills.

Trampoline Handbook
Trampoline Handbook on Amazon

If you found this tutorial useful. Check out the GMB Vitamin Course to gain more skills similar to the roll.

Stay Inverted!
-Jonathan Magno


Comments { 0 }

Forest Vance and his Sneaky Trick to Do More Push Ups – Instantly

We’ve got another guest post from  Certified Progressive Calisthenics Instructor Forest Vance. Last time he discussed a bodyweight apparatus mainstay with the pull up.

Today he’s coming back with a sneaky trick in order to develop your push up.


Sneaky Trick to Do More Push Ups –
Instantly by Forest Vance, creator, Bodyweight Strong

A couple of years ago – after charity event we had held at FVT Boot Camp – we went out to a bar to eat, drink, and celebrate.

Several of us get to talking about how many push ups we think we can do … one thing leads to another, and before you know it, I’m in the middle of a push up contest!

The guy I was going against could do a surprising amount of push ups…I ended up squeaking out a victory, but barely …and the big way I was able to do it was using the technique I am going to share with you in today’s article.

Try this technique today … if you do it right, you’ll be able to do more push ups, instantly!

Sneaky Trick to Do More Push Ups – Instantly

– At the top of your push up, get as tight as you can. Take a deep breath to load up your muscles. Tighten your upper body, legs, core, everything.

– Drop into your push up without letting your breath out. Maintain tension in your abdominals and throughout your entire body. Do NOT exhale or let tension ‘escape’ in any way!

– Exhale as you press through your sticking point in the push up or after you finish the move. This will also help you keep tension throughout.

– Once finished with the push up, pause at the top and take a breath or two. Either lower back down to the ground and repeat, or rest.

Walking and Jumping On Your HandsWalking and Jumping On Your Hands on Amazon

This is a technique that can be used to tap into additional strength reserves, and boost your strength and power instantly. You can use this technique not only for push ups, but for other bodyweight moves as well, and also when lifting heavy weights. Give it a try today – I think you’ll be surprised at the results!

Train hard, and talk soon –

Forest Vance Author, Bodyweight Strong


Stay Inverted!
-Coach Jon

PS – For more tricks like the one outlined in this article, and for a full 12 week bodyweight only training program that will take you from whereEVER you are now, to bodyweight STRONG, click the link below:

Bodyweight Strong.


Comments { 0 }

Can’t Do Pull Ups? Forest Vance Will Show You How to Get There!

We’ve got a special post on  the pull-ups by Forest Vance for you today.

If you have problems, with this pulling motion, take a look at some of the things Forest will show you below!

Hand Balancing Made EasyHandBalancingMadeEasy_on_Amazon

— The difference between a pull up and a chin up .. and which one is easier
— What “counts” as a legit pull up or chin up rep
— The PROPER way to do a jumping or assisted pull up or chin up
— The PROPER way to do a band-assisted pull up or chin up
— How to work to full, unassisted pull ups / chins ups – and beyond

Have a look at the video below!

Stay Inverted!
-Coach Jon

PS If you liked the information he gave out, have a look at his program Bodyweight Strong.


Comments { 0 }

Building your core to handle your balance skills or get more athletic!

We’ve got something a bit different for you today. As many of you who have attempted to do a freestanding handstand or even a wall handstand know, having a strong core is one of the key factors in keeping yourself inverted or even in safely getting up into a handstand safely. You also need to be dynamic in your mobility and flexibility.

Now, the reason why today is different is because you’ll rarely see me posting a movement drill with weights, although I do them myself. I like to stay focused on the buildup of the skill. But once the skill is built up to a certain point, you need to start testing it in different modalities in order to develop the dynamic nature of the skill. Remember, even though we are doing a “handstand hold”, we are actually dynamically adjusting to all the different changes while in the inverted position.

So, for today’s post we have a simple yet effective QM(quadredal movement) that you can do in order to test your functional movement and build your core to handle those dynamic changes. An added tip is to add a hollow body to movement to really engage your mid-thoracic and lower lumber!

Here is the video.

How to do the One Hand Handstand by Professor Orlick
ow to do the One Hand Handstand on Amazon

Stay Inverted!
-Coach Jon

PS If you really liked the drill, its by our good friend Nick Nilsson. You can find other great core exercises in his Best Core Exercises ebook!


Comments { 0 }

Stunts, Skills, and a 60-Second Game Plan

Why 60 Seconds. I’d like to start off by saying that I’m a big advocate of education, skill development, and finding out what it takes to learn effectively. In my last post I talked about gaming and how it could be a new approach with your handstand development. Lets be honest, our bodies are a biological mass created from responses to a multitude of possible external stimuli. Basically the crap that we do with our bodies can change what makes us – us!

Trampoline Handbook
Trampoline Handbook on Amazon

I’m not saying that you can jump into a vat of toxic chemicals and become a superhero/villain. What I am saying is that the things we do, has an effect on how our bodies are put together. Here are a couple of possible examples. If all you do for your core are sit-ups, you might have a weak lower back. Like-wise if you do a lot of upper-body strengthening without flexibility work, you might not be able to maneuver yourself into the alignment necessary to balance out a handstand.

So why 60 seconds. We’re using this as a baseline goal to reach for. A guiding light to pull yourself toward without getting lost in the sea of thoughts, stimulus and information. So where does the 60 Second Game Plan come into play with your handstand?

The Lead-up Stunts. Its a pathway of primary goals that can make the path to the freestanding handstand clearer of obstacles.

To partly break it down, here is an excerpt from our Secrets of the Handstand ebook:

Here are your first goals. Before you even attempt the freestanding handstand I want you to work up to one minute or 60 seconds in each of the main lead-up stunts.
1. Wall Handstand
2. Frogstand
3. Headstand
4. Forearm Stand
5. Elbow Lever
You’ll find that some of these come easier then others. If they do you can work on some of the other variations. For instance if the headstand is easy, but you’re still working towards the other moves, do the yoga headstand and try to get to 60 seconds there. It’s not an absolute requirement that you master every one of these moves. But if you do build up to 60 seconds in each of these moves, then the freestanding handstand will be much, much easier. Everyone wants to skip ahead to that part, but without the foundation it’s just going to be frustrating work. Contrary to that, working on these moves you’ll probably find you can add time just about every day to most if not all of these moves, at least in the beginning.

So, let’s break it down even further. Each of the different Lead-up Stunts become a different mini-quest on your final journey to the handstand. Each time you unlock one of the 60 second skills, a new set of tools become available to you that can really help you understand and perform the handstand. Some of the unlocked tools could be managing the fear, stabilizing with the hands, or even working on the upper thoracic. Now that you have a better idea about how to turn the development of the handstand into a game, I’ll start going over the lead-up stunts in the next set of posts!

Stay Inverted!
-Coach Jon

PS If you can’t wait to take to learn more about these lead-up stunts, be sure to to check out the Handstand Mastery Program!


Comments { 0 }

The Handstand Game and Leveling up your Skills!

Whats going on Hand Balancers!

The handstand is one of those moves that can hit the range of being extremely easy to massively difficult. Honestly it just depends on the person, their starting point, and any deviation from the norm that could add that little bit of guesswork in order to complete the task. Things to look at would be finger strength, thoracic flexibility, and a whole set of other factors that can make or break your handstand.

The reason I’m talking about this is because, learning that handstand can be similar to playing an online roleplaying game or mmorpg. It might be a bit confusing, but hear me out. At LAOHB our Handstand Mastery Program focuses on 5 different skills in order to reach your goal.

These are the skills:

1. Wall Handstand
2. Headstand

Handstand and Headstand

3. Frogstand

Frogstand Press 1
4. Forearm Stand

Tiger Stand
5. Elbow Lever

Elbow Lever

Now these 5 different skills or lead-up stunts aren’t all necessary in order to reach the end goal, but they give you an advantage or specific ability that will work for your specific avatar to achieve the handstand. Each of them have their advantages like the elbow lever being your tank character because of the resounding strength it creates across the entirety of your line or the headstand being your balanced warrior because its the first step to learning how to stack your joints and keep your alignment.  With that said, over the next month or so, we’ll be revisiting these different lead-up stunts to help you attain your goal.

*note. I might not be as geeky during those posts!

The True Art and Science of Hand Balancing
The True Art and Science of Hand Balancing on Amazon

Stay Inverted,
Coach Jon

PS If you can’t wait to take to learn more about these lead-up stunts, be sure to to check out the Handstand Mastery Program!


Comments { 0 }

Swinging for Primal Harmony

Reclaim your origins

Reclaim your origins

I know you feel it.

The blood flowing through your veins, calling, begging your body to return to the glory that was intended for it at birth. You can look at yourself and see the beauty of your own design: hands made not only for intricate processes like tool use and development, but for incredible pinching and crushing strength. Shoulders that can stabilize as well as they mobilize, attached to scapulae with 17 different tendons connected to transfer muscle power very efficiently. Your body was made for the beauty of brachiation, and it’s only fair that you reclaim your birthright.

What Is Brachiation?

Even without knowing much about the character, if I say “Tarzan”, you likely think of a wild man pounding his chest and swinging from vines. Well brachiating is just that: having the ability to swing on vines, branches, and whatever our hands can manage.

Swinging may not be something you recognize as a birthright as you would, say, bipedal movement, but if you think about it, jungle gyms and playgrounds almost always have an element that allows kids to do what they naturally enjoy: swinging. (They aren’t called monkey bars for nothing)

Swinging is critical to overall shoulder health. Gymnasts and traceurs swing often in their training, and you never hear of them suffering from a frozen shoulder joint, yet that problem plagues numerous trainees in the fitness industry. We often try to substitute by doing supplementary exercises to ease into mobility, but there are so few exercises that can encompass the benefits of the whole body dynamic nature of swinging

This is simple enough: find a bar, rope, or some other hanging element that you’re comfortable grabbing, and simply practice swinging back and forth, 20 swings forward and back. Doing this simple thing daily will start to make an incredible change in your mobility and grip strength in as little as a month. As you progress, practice swinging with only one arm, then practice reducing fingers and so on.

Shoulder Dislocates

Okay, this isn’t as painful as it sounds. No, the key to reconnecting with your original movement pattern is not forcefully popping your shoulder out of its socket.

However, the kind of mobility and strength toward both hand balancing and bar workouts that you get from training controlled shoulder dislocates is phenomenal. I’d argue that any and everyone seeking true movement mastery should add this one exercises to their repertoire.

Cue the video instruction, courtesy of our friends at GMB.


This can also be done with a towel. If you have the mobility to bring the towel or broomstick all the way down to your lower back, do so, but don’t rush or force the process. Your body has been programmed by years of immobile practices, so truly recovering your full mobility will be a progressive but worthy process.


In other words: reclaim the primal, primate strength that you deserve, and swing, baby, swing.

Ultimate Guide to Handstand Pushups
Ultimate Guide to Handstand Pushups on Amazon
Comments { 1 }

Underkicking and Overkicking: The Secret Step to getting your Kick-Up

2 Common Handstand Kick Up Issues (and how to solve them)

Whats going on Hand Balancers!

Wall Handstands and Kick-Up Wall Handstands. Those are the usual starting points for people wanting to get into handbalancing. But what do you do after that. The very first goal usually revolves around getting into a solid freestanding handstand. Although having the safety of the wall can have its share of scares. Some of which could include:

  • Bending in an odd way
  • Losing control and falling
  • Falling on your face
  • Not having enough strength in your arms

There are lots of different tactics in order to get into the kick-up. One is utilizing underkicking or overkicking. In the first scenario, you’re not generating enough force to reach the “sweet spot” of balancing at the top, so you simply fall back to your starting position. When you overkick, you’re moving past the equilibrium point and fall forward. You can turn sideways into a carthwheel to land safely.

So where does this come into play?It helps you find the “sweet spot” while having a baseline of underkicking and overkicking. Take note of the results from each kick up attempt to determine how hard to kick the next time. In general, kick a little harder than you initially think, because it’s harder to stop yourself from underbalancing than it is to slow down your movement as you reach the balancing point. Use your hands and fingertips to press into the ground and control yourself in the handstand position.


Tumbling Illustrated
Tumbling Illustrated on Amazon


We hope that this helped you gain some perspective on your freestanding handstand and how to get into it. If you need any more help, we’re willing to offer a “no strings” consulting session on the handstand. This will only last til the end of the week at 11:59pm on Sept. 17, 2016. You could get a hold of us by emailing us at [email protected]

Stay Inverted,
Coach Jon


Comments { 0 }

Conor McGregor Movement Training

conor mcgregor nate diaz

Photo courtesy of mmajunkie.com

Trampoline Handbook
Trampoline Handbook on Amazon

Tonight is the long awaited night: the two powerful welterweights Nate Diaz and Conor McGregor will go at it for the second time in a fierce battle to prove the stronger welterweight once and for all at UFC 202.

While Nate Diaz won the last bout and proved himself a much more patient and strategic fighter in their first bout, Conor McGregor seems to have honed his focus and sought more patience in this fight.

What, then, has he sought in his training?

It may make more sense to say whom. Ido Portal is an Israeli movement expert who seeks to find a union between strength, conditioning, and technique. We’ll get to see below the ways that Ido sought to blend the three together for Conor in his next bout, as he helped Mcgregor attain the physical shape to defeat the legendary Jose Aldo in a mere 13 seconds. (He has trained other MMA fighters as well, like Alberto Mina.)

Ido Portal Method

Conor Mcgregor continually hones his striking. Both his fists and feet are fierce weapons in the ring, both thus far unmatched in the 145 weight class. But he has focused on training that truly boosts his mobility in the ring, training with complex and bouncy animal movements and different movement chains that engage the tendons and ligaments, boost proprioception, and aid the utilization of full body power in fight situations.

Here is a video of some of the movement training that McGregor did with Ido Portal as he trained for his last fight. I’d say more people understand how important body movement is for overall health and functionality. Are you one of them? If so, watch this video and try out some of the movements for yourself. I truly believe that you’ll discover patterns and freedom of movement that will get your body singing.

And tonight, may the best man win!

Comments { 0 }