Archive | Hand Balancing RSS feed for this section

A Superhero Solution to a Tiring Exercise

The Burpee!

There. I’ve said it.

Love it or hate it. The burpee is a mainstay in most fitness routines. I’ve even used it in my programming, although sparingly. Don’t get me wrong, the burpee is a solid exercise covering many different muscles groups while including strength, balance work, and power development. Although I normally see people use it as an ending metabolic finisher or something to throw in and get their clients tired. Honestly, it actually pains me to watch people run through technique without activating the correct muscles.

There’s a lot going on in that seemingly simplistic exercise, but that’s for another day and another breakdown.

Today I’m going to talk about doing something different with your burpee. Giving it a little bit more mobility, while also working on your motor control and endurance.

I usually breakdown the normal burpee into 3 different pieces. No different here.

This Superhero burpee includes a forward crawl, lateral jump, and even a cartwheel!

Take a look below to see how you can turn your burpee more superheroic: Spider-Man Style!

Hand Balancing Made EasyHandBalancingMadeEasy_on_Amazon

If you liked the video and want to develop your body’s endurance and conditioning, check out The Ultimate Guide to Bodyweight Conditioning!

Stay Inverted!
-Jonathan Magno

Comments { 0 }

An Easy Fix to a Pressing Predicament

Today we are going to jump back towards simpler times with a supposedly simple exercise.

The Pushup.

Although it is a seemingly easy exercise, it can cause trouble for some people.

Whether it be sinking of the hips or lack, lack of core engagement, or any of the other number of possible problems.

Don’t worry though.

There are many methods to fix your pushup, and I’ve found a simple way to get you to feel the right movement while using a simple prop.

Take a look at the video below to see the simple tip to a better pushup!

If you liked the handstand pushup in the beginning of the video and want to develop them yourself, check out The Ultimate Guide to Handstand Pushups!

Stay Inverted!
-Jonathan Magno

Trampoline Handbook
Trampoline Handbook on Amazon
Comments { 0 }

The Monkey Stall and your first freestanding handstand!

First off you’re probably wondering what a monkey is. Well its a foundational movement pattern from the folks at GMB or Gold Medal Bodies.

If you’ve been following LAOHB, you know two things.

  1. I like to joke around.
  2. I’m a big fan of their style of training.

So lets get back to the subject at handy. The monkey and your first freestanding handstand.

Usually when a person attempts their first handstand they place their hands on the ground and drive their legs up with the hope that they stay inverted. This can be scary for most people and can be a bit difficult to control when you are starting out. The reason being that you’re utilizing your strong posterior muscle groups to drive and then change to stabilize with hopes that you don’t fall on your back or on your face.

By a mix of training clients, personal training, and utilizing the GMB Method; I think I might have found an easier way to get up into the handstand without so much fear.

This is where the monkey comes in.

While the monkey is a locomotive pattern, its focus is on lateral movement. So while you are moving laterally, you can use your stronger muscle groups to focus on stabilizing. Its a simple answer to a scary question.

To illustrate I have another funny video below. I hope you like it and gain something new to play with!

To learn more about the monkey and the GMB Method, check out the GMB Elements Program

The True Art and Science of Hand Balancing
The True Art and Science of Hand Balancing on Amazon

Stay Inverted!
-Jonathan Magno
Comments { 0 }

Mini-Handbalancing Work for a Mini-Holiday

Usually I am able to send out a post from my studio space in Sunnyvale, California; but today I’m sending out good vibes from Sunny Los Angeles while taking a mini getaway vacation. A couple of fun things involved checking out the KTOWN Night Market and today its all about hanging and training at Santa Monica Beach!

Which brings me to my next point. How do you make yourself work on your skills or even skill development while away?

Tumbling Illustrated
Tumbling Illustrated on Amazon

Finding time to work on your skills in an unfamiliar place can be a difficult.

Luckily for me, my morning routine is pretty much set internally whether I’m surrounded by familiarity  or by new and epic experiences.

Although, just like any trip, preparation can be key and obviously we’re here to help!

So here are a few tips to get you going!

  1. We all know that you probably have a set list of things that you want to do while you’re away. So make sure you add a block of time for your training when you know you’ll get it done without distractions. If you think forward, you’ll be better prepped.
  2. Add a fitness tracker app to your phone. There are a lot of good ones out there that will keep you accountable, even when you’re not on a normal schedule.
  3. Final tip, check out the local parks. Likelihood is that there will be a good one a mile or two away from you if you’re in a city. This sets you up for a nice warm up run and cool down for your session,

BONUS TIP!!!

Some of you might be away from everything. Out in the middle of nowhere. If you are, then this is the perfect time to perfect your skillwork like your precision jumps or even the handstand pushup!

I hope these tips help you get a headstart to being healthy and active on your downtime. If you need some help on what skill to develop, check out logan performing the Handstand Pushup below!

Stay Inverted!
-Jonathan Magno
Comments { 0 }

Super-Stabilization for your inverted work!

Have you ever tried to do a handstand and held it for a second only to fall once again? Maybe you got into the movement only to immediately fall back into the ground. The key to staying up doesn’t just involve your strength but also your motor control. You should feel aligned and be confident in your stabilization.

This can be a tricky thing. especially when your goal is to both lengthen certain parts of your body while at the same time shorten other parts.

How to do the One Hand Handstand by Professor Orlick
ow to do the One Hand Handstand on Amazon

So what can you do? Well I’ve got an exercise that can help you understand and walk that fine line.

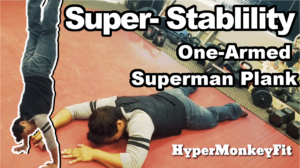
The One-Armed Superman Plank.

Here are a couple of key points to think about.

Lengthening is important in this exercise, so make sure that you are outstretching your extended arm as much as possible.

Another key point is your alignment. So work hard to keep the outstretched bicep next to the ear and try your best to keep your hips parallel to the floor.

I know its going to be hard, but you can do this.

Finally, to really dig in, check the video below!

If you want to gain an in-depth approach to your handstands, check out the Secrets of the Handstand Quickstart System Now!

Stay Inverted!
-Jonathan Magno
Comments { 0 }

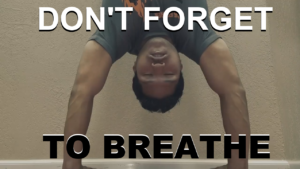
Breathing While Inverted

Today I’m going to be going over some points to help you with your  breathing. Whats funny is that these tips can help you even if you’re right side up.

Tip 1
Let yourself in the space that you are going to breathe naturally. Starting off in the right framework is a great way to initiate your instinctive nature to do whats needed.

Tips 2 and 3
Second, take a look at your alignment. Is your spine and neck straight? You can align your spine by keeping your biceps by your ears and also relieve possible tension on your neck by looking straight ahead and not down.

Tip 4
The final tip is to not overthink your breathing. If you’re too focused on it, you might unconsciously hold your breath. So to combat this, try talking to somebody or even singing!

This post involved some pretty quick tips. To illustrate the information, I’m trying out a new way of delivering the information in a more cinematic fashion.  Check it out in the video below!

If you want to gain an in-depth approach to your handstands, check out the Secrets of the Handstand Quickstart System Now!

Hand Balancing Made EasyHandBalancingMadeEasy_on_Amazon

Stay Inverted!
-Jonathan Magno
Comments { 0 }

A Gymnastic Skill: The Front Walkover

When you learn how to move, many variations start to become available to you. The transition between your limbs becomes an art form.

Lets take hand balancing at two of its base variations. The handstand itself and cartwheel. These are the two inversions that we all tend to start with. I’d wager that a good amount of us began with the cartwheel before the handstand because it gave us a clear pathway to return to.

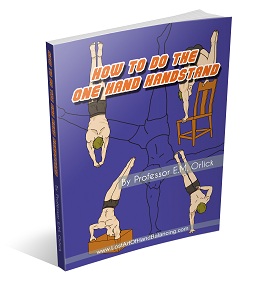
A good way to test your movement capability is to run through different planes of motion. A more difficult possibility move from the cartwheel would be the Front Walkover. If you look below you’ll see a composite picture of Diane Robinson performing the move with ease.


Walking and Jumping On Your HandsWalking and Jumping On Your Hands on Amazon

A vintage magazine called Acro-Chat lays down some quick instructions for you. The correct way to do a two arm walkover. Notice the arms are straight all the way through, the legs are extended and split as much as possible, the back is arched tightly with the head and arms trailing as she stands upright.

Now a word of caution, this move does take a large amount of flexibility in both the back and legs. Although its not dangerous, you might end up falling a couple of times in the beginning.

You can also perform a back walkover which is done moving backwards. Just follow the pictures from right to left and you’ll get the idea.

Quick note: These moves are not to be confused with the handspring or back handspring. Though the motion is much the same, except for going off of two legs instead of one, there is another big difference. Your hands will touch the ground before both your feet leave it in a walkover. Handsprings involve leaving the feet to get up in the air before your hands touch down.

If you tested the front walker and see that it might be out of your range, try experimenting with different movement patterns to increase your acumen. If you still need help, try picking up the Gold Medal Bodies Vitamin Program!

Stay Inverted!
-Jonathan Magno
 

Comments { 0 }

Awesome Abs Exercises 2 – The Hollow Body Hold

Two key Abdominal Exercises to train your core in order to handle to the handstand. In the last section I discussed an exercise that you probably don’t always attribute with the handstand, the Superman Plank.

Today we are going to be going over the inverse of that. This exercise is a staple among gymnastic or athletic movement. Needless to say, the handstand is a definite inclusion into that category.

Lets introduce the Hollow Body Hold.

For the Hollow Body Hold, lie on your back and tighten your abdominals while driving your lower back to the floor.

Extend your arms above your head while keeping your core engaged.

Once you’ve held this position, extend your leg away from your body and lift them away from the floor. Make sure that you point your toes and squeeze your legs together.

Hand Balancing Made EasyHandBalancingMadeEasy_on_Amazon

For an added touch of alignment, roll your shoulders off of the floor while keeping the body engaged.

There you go guys if you have any questions, don’t be afraid to contact us and one final thing. Don’t forget to pick up The Ultimate Guide to Bodyweight Abs Exercises now!

Stay Inverted!
-Jonathan Magno
 

Comments { 0 }

Awesome Abs Exercises 1 – Superman Plank

Previously I stated that you can’t become an excellent hand balancer without a strong core.

How do you achieve that? Do normal sit-ups and leg raises cut it? To work on a  strong core with a clean and extended line I have two Exercises for you…

The Superman Plank and the Hollow Body Hold. These two exercises get you to engage the core muscles in an extended fashion. One has more focus on the anterior side and the other on the posterior side. So you become sandwiched in a strong locked position.

Lets start with the Superman Plank

Learn How to Back Flip in 31 Days
Learn How to Back Flip in 31 Days on Amazon

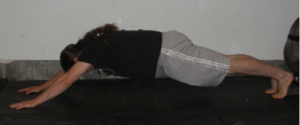
To get into a superman plank, start in a basic plank position with your hips tucked, your glutes engaged and your back straight.

Be sure to start in the extended arm position. Walk your hands forward until they are at the farthest  position above your head with out breaking form.

Hold this from anywhere between 20 seconds to a minute. If you would like to test yourself, try for even longer!

Give this drill a try and let us know how you do. In the next installment, I’ll be talking about the hollow body hold.

Stay Inverted!
-Jonathan Magno

P.S. To learn more awesome abdominal exercises, get The Ultimate Guide to Bodyweight Abs Exercises now!

Comments { 0 }

The Abdominal Acrobat

I’m going to start this off with a Powerful Statement.

You will NEVER become an excellent hand balancer or acrobat without having incredibly strong abs. The Core is King; or Queen for that matter.

The focus to achieve this on the core is not to get the holy grail six pack (although the side benefit is nice), but to train your body as one unit. Does this sound familiar? It should because that’s exactly what you need do pull off any hand balancing stunt.

The abdominals help to lock you in and keep the hold or stabalized for transitionary movements like the Straddle Press!

Over the next week, I’ll be going over ways to strengthen your core to achieve powerful acrobatic abdominals!

Ultimate Guide to Handstand Pushups
Ultimate Guide to Handstand Pushups on Amazon

Stay Inverted!
-Jonathan Magno
P.S. If you can’t wait to build acrobatic adbominals, get The Ultimate Guide to Bodyweight Abs Exercises now!

Comments { 0 }